Correcting the Corps History – The 1 in 4 Horse Holding Myth
The next point that I need to address from Chapter 16 of the Corps History is that the Author attributes the lack of available manpower available for tasking is the fact that the majority of the Squadron’s personnel were occupied with looking after the horses when dismounted.
Blogger’s Note – In cavalry terms – a section relates to 4 mounted riders and a half section is 2 mounted riders, mounted units would move either by section or half section columns.

In the previous post https://horsebacksapper.co.uk/2023/04/15/correcting-the-corps-history-re-field-sqn-manning/ I looked at the Manning numbers and where these numbers are wrong or where they are correct to explain how they are put together and and explaining where the other manpower was being used.
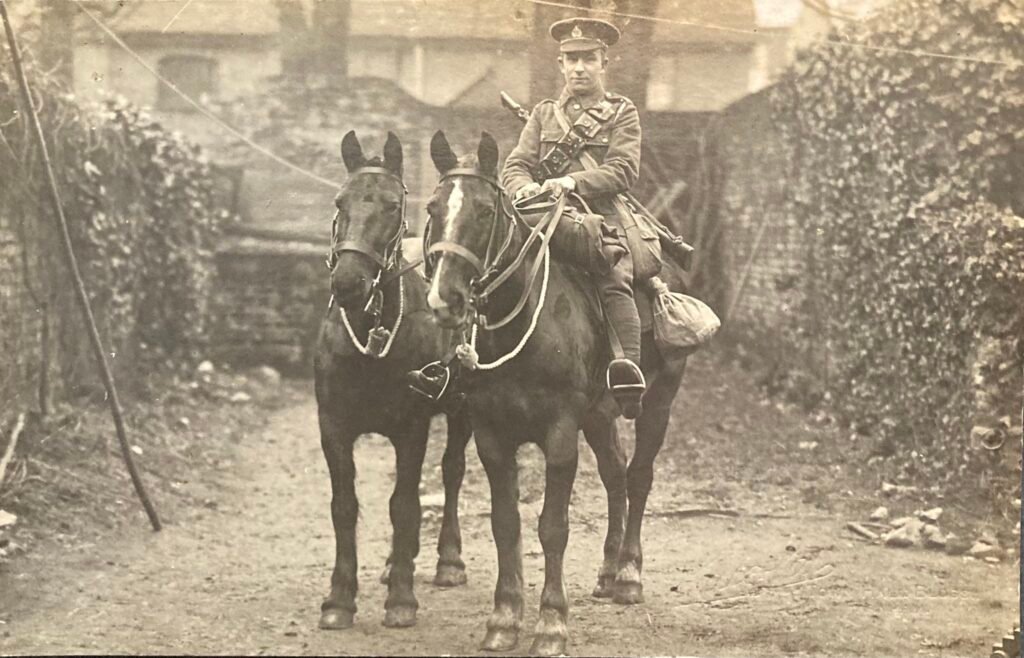
This post is linked with the numbers of 70 NCOs and Sappers being available for working in the Trenches. The author has picked on the fact that when a mounted unit dismounts 1 man in every 4 would remain mounted, gather up the reins of the other 3 horses and lead them away to a safe point/ safe area. This is the comment from Chapter 16:
“Acting as field companies when their divisions were dismounted and sent into the the line. A cavalry division could produce about 1200 rifles and a field squadron at most seventy men to go with them. Small though these numbers may appear, they meant that each man left behind had at least four horses to look after.“
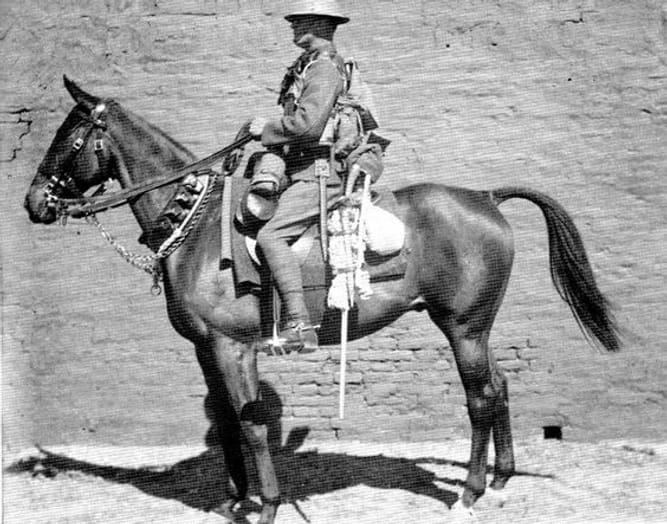
I have already justified the 70 men number but I want to look specifically at the “1 in 4” misconception. As stated above it was true that when a Mounted unit dismounts 1 man of each Mounted section (a 4 man team) would stay mounted and ride away with the horses. This is described clearly in the Cavalry Training Manual of 1915, Section 153 and Section 213, this states that the No3 Rider of the section would remain mounted, take the reins of the other 3 horses (2 on his left and one on his right) and lead them to a specified rear area. It is also stated in the Cavalry Regulations of 1907 (Sect 106).

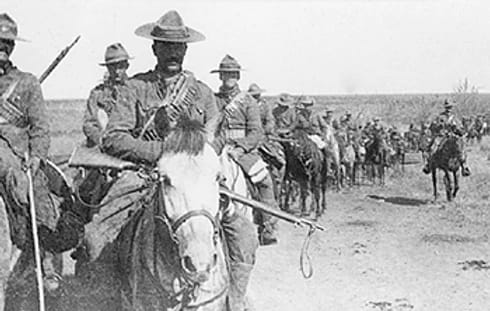
Image from WW2 but clearly shows the principle of No3 Rider moving the horses away at pace to a safe rear area 
Kings Troop RHA still use the same principles and skills today to exercise their horses while using minimal personnel 
mules left tied on a picket line with their nose bags 
THE BRITISH ARMY ON THE WESTERN FRONT, 1914-1918 (Q 8446) Royal Field Artillery horses are sheltered near a ruined church in Ytres, 18 January, 1918. Copyright: © IWM. Original Source: http://www.iwm.org.uk/collections/item/object/205216096 To make this even more RE Field Squadron specific, Mounted Sappers were required to be trained to Mounted Infantry Standards and the governing manual was the Yeomanry and Mounted Rifle Training Manual of 1912 and the relevant sections for dismounted action and leading horses was Section 108 and Section 149. These regulations all match.
So the Chapter 16 Author is right?…..Err….No, no he isn’t, he completely has misunderstood the 1 in 4 rule.
Everything that is quoted above related to riding into combat (advance to contact if you will) and then the unit dismounts to fight. This isn’t about going into the trenches (into the line). If the squadron was going into the Trenches then the horses would be back with the Echelon and in Horse Lines – I’ll talk about this later in this post.

Horse Holders of 4 ALH But coming back to the dismounted combat, with the horses ridden back to safe area the No 3 rider would dismount and manage the horses dismounted. If more men were required on the firing line then the man of every second section would go forward, leaving one man with 8 horses (possibly bringing forward the extra ammunition bandoliers that were hanging round each horses neck). So in theory for a full strength Field Troop of 1 officer and 23 Sappers (remember that 7 drivers are with the Troop GS wagon and Troop Tool Cart) would only require 3 horse holders not the 6 suggested.
So that is in the field, under fire, so what about when the unit went forward into the Trenches?
Well the unit horses would be held at the Echelon location or at a Brigade Cavalry Lines and these locations would not require the loss of a man in every 4. Horses that are held in a rear area would be held on a picqueted line or in more formal horse lines and this would allow for the horses to be tied onto the horse line and then managed by a small number of men. the management of picqueted horses and horse lines is very clearly laid out in the horse management manuals and the Light Horse Pocket Book of the Australian Light Horse (ALH) explains the horse lines duties very clearly:

4 ALH horse lines in Egypt Page 49 – Day Stable Picquet
1 man per half Squadron (ALH Squadrons are only slightly smaller than an RE Field Squadron at 150 men) will start duty at “Morning Stables” until relieved by the Night Stable piquet.
Duties –
Keep the horse lines clean
Prevent Horses from Injuring themselves
Remove Nose Bags and make out hay ration if issued.
Make sure that all horses are quiet
Make fast any horses that get loose or draw their pegs
Replace rugs/ blankets that fall off
In the event of rain then cover over the nose bags, forage, clothing etc
Act as the horse lines sentry, prevent any smoking, and prevent unauthorised persons from entering the horse lines.
At night time this picquet is increased to a Section (NCO plus 3 men). These individuals are on one at a time on a 2 hour shift/ stag with very similar duties as the day stable piquet. The only difference is that they are to make sure that men of the squadron do not loiter around the horse lines.
These duties and details are standard for British and Imperial mounted units.

THE QUEEN’S BAYS ON THE WESTERN FRONT 1914-1915 (HU 110557) Horselines of The Queen’s Bays, note windbreak constructed along edge of treeline, winter 1914. Copyright: © IWM. Original Source: http://www.iwm.org.uk/collections/item/object/205311623 
A well established and set up rear area horse lines. Therefore it can be seen that when a RE mounted unit has it’s horses in the horse lines then you are looking at 2 men during the day from the Squadron total,( field Troops and echelon) and then at night this would go upto 8 men. In all of these situations these are the maximum figures and even with the Field Troops in the trenches it is manageable from those troops of the Echelon as they would have to do these duties for their own horses anyway.

So we can see that the author of Chapter 16 is wildly incorrect in the statement that “man had become the slave of horse”.
My view is that the author has not spent time with horses but has latched onto the view that all horse management when the unit dismounts requires 1 Sapper out of 4 men to be fully employed to look after the horses, The suggestion from the author would be that the horses would require 48 men to look after them (that is almost all of the Echelon or 2 Field Troops). Hopefully I have shown that this is not the case and again I feel that the lack of actual knowledge or research by the author has allowed the Mounted Sappers of the Field Squadrons to be unfairly characterised as being inefficient and/or ineffective.
The question to ask of the Author, if the RE Field Squadrons were so inefficient and ineffective why were they expanded from one Field Squadron to five Field Squadrons (not including the Australian Field Squadrons)?

Canadian Cavalry, Possibly the Fort Garry Horse, with the Troop carrying out a Stables parade on the horse lines. This would be compulsory attendance for all men of the unit to attend to work on their horse – The Unit Adjutant and Duty Officer were not even exempt! Bloggers Note – I want to just add that Horse and Mule Management was taken incredibly seriously by the British Army, it had learned hard lessons from the Boer War and looking after the equines was an important task. The RE Mounted Units were an important part of that process be that creating wind breaks and shelters for the temporary Horse lines in the Cavalry Holding areas or for the construction of better horse lines in the rear areas.

Please go back over this post and have a look at all of the Horse line images and look at how few men are with the horses on the line. This was a routine duty and had little impact on the manpower or effectiveness of the Field Squadrons.
In one of the future blog posts I will look at dispelling the myth that the Mounted sappers could not carry out engineering when mounted.
Correcting the Corps History – RE Field Sqn Manning
This will be the first of a number of blog posts over time that will look to correct some of the incorrect details and negative views put forward in The Royal Engineers History, Volume 51. So what’s my problem with this? The Field Squadrons and Field Troops have their own chapter in Volume 5, focused on the units on the Western Front, and this is Chapter 162, my problem is that it is one of the only chapters in the volume that is negative and dismissive of the works of the Sappers and Officers in the Great War. It also has been written in a way where the opinion of the Author is used more than actually stating facts or details, which is at odds with many of the other chapters that are written in a more factual way.
Now let me make this clear, I am a serving Sapper and have been for 36 years, I’m incredibly proud of my Corps history but I feel that the Field Squadrons and Troops of the Corps are being done a disservice by the Corps written history.
I did originally planned to do this as an article for the RE Journal, however the further that I dug into Volume 5 for research, then cross referenced with war diaries and other documents I realise that there was too much to try and squeeze into a 2000-3000 word article. To that end I plan to pick up on a topic area and then explore it and go through the details that I’ve found that contradicts the detail or explain what has been stated in Volume 5 and why I consider it to be incorrect or misleading.
Now I complained that the Author has stated opinion in the article, I will also be giving my opinion and some assumptions but I will aim to point them out and support/ justify them with my rationale behind my views and assumptions.
When I volunteered to take part in the War Horse Ride in 2014, I felt that I needed to understand the history of the period and the unit I was being asked to ride in memory of, and so started the research in the Mounted Sappers and my evolution/ creation of the Horseback Sapper began. I used the Corps History Volume 5 as my first point of call and supported by websites like the https://www.longlongtrail.co.uk/ 3 . At this point I was soaking in information but it was only from 2016 onwards when armed with more information that I started to see the negative side of Chapter 16. With further research and more time spent in the unit war diaries and in the articles in the RE Journal I started to see that the research for the chapter was only surface deep and seemed to lack some of the knowledge of someone that served with the Field Sqns in the Great War, and my suspicion was that they may not have served in the Great War at all 4, the author uses large elements of Colonel WH Evens DSO RE Journal article from 1926 5. Indeed Volume 5 lists all of the people that helped in the production of the Great War Volumes but it doesn’t attribute who wrote what chapters. I’ve even asked the Institution of Royal Engineers and the RE Historical Society if they have the details about who wrote each chapter and unfortunately they don’t. I’ve even been compiling the list of officers that served with a mounted RE unit and so far none of the names appear listed in the front of Volume 5, (also bear in mind the Volume 5 was published in 1952.)

So lets focus on the first area of contention – The manning size and scale of the RE Field Squadrons.
The following are quotes from Chapter 16 of Volume 5:
“A Cavalry Division had a Field Squadron RE consisting of a HQ and 4 troops, each troop an establishment of one officer and about 40 NCOs and Men.” (page 426)
“The establishment of a Field Squadron was 225 men and the same number of horses” (page 427)
“A Field Squadron was not an economical unit. From a whole squadron it was impossible, even under favourable conditions to provide a dismounted working party of more than 70 NCOs and men, and this left the remainder of the Squadron practically immobile and quite unproductive.” (page 427)
This last statement is repeated a number of times through the chapter and while the number is correct, the reasoning is wrong, but I’ll get to that in due course.
So looking at the first quote. At the start of the war the Field Squadron is an HQ and 4 Field Troops, this allows for a Field Troop to be allocated to each Cavalry Brigade, while that may seem a small amount of sappers to a Brigade Formation when you compare an Infantry Division had 2 Field Companies (later 3 Field Coys) to cover the 3 Infantry Brigades. However something that has been missed by the Author is that Field Engineering was not an unknown quantity to the Cavalry. In every Cavalry Squadron there would be 12 trained Cavalry Pioneers (9 in the Household Cavalry Squadrons)5 who had completed and passed a Field Engineering Cadre delivered by the RE Field Squadron, along side that every Cavalry Subaltan would have had a Field Engineering module included in their Troop Commanders Course – so a typical Line Cavalry Regiment would have at least 48 Cavalry pioneers trained in the following:
- Crossing Rivers by improvised means and using Air raft equipment.7
- Demolitions of railways and bridges.
- demolition and repair of telephone lines
- Construction of simple field defence works, entrenchments and loopholes.
All of this training was done in accordance with the manual of Field Engineering8.

Air raft equipment being used by the Cavalry at Aldershot pre-war with what appears to be a families day. The part that is wrong in the first statement is the numbers in a Field Troop, while Volume 5 states 1+40 the reality is that this is the rough number for a Field Section of a RE Field Company. The Field Troop was actually 1 Officer and 30 NCOs and soldiers.
So where where might the 1+40 number come from if it’s not a mistake from the Field section? Well a very good lecture was given and written up for the RE Journal by Capt E.W. Cox RE in 1913 where he provides a lecture at the School of Military Engineering to No.3 Senior Officers Class9 with reference Field troops and their role and function with the Cavalry Divisions and Brigades. This is a really useful article with a lot of information but it does move between the Troops of the Squadron supporting the Cavalry Division and it’s Brigade, and the Field Troop that supports the Independent Cavalry Brigade. why is there a difference. This “Independent” field troop is self supporting as it has more personnel to allow for it’s own HQ, a slightly larger field troop element and a small integral Echelon. The field troop element is bigger to support a slightly larger Brigade organisation and this element is 1+40, I suspect that this may be where the Author picked up the number from.
Just to close this out as well not all Squadrons had 4 Field Troops, once fully established 1 and 2 Field Squadrons did have 4 Troops, but 3 Field Squadron operated with 3 Field Troops and both the 1st Indian Field Squadron (later renumbered 4 Field Sqn) and 2nd Indian Field Sqn (later renumbered 5 Field Sqn) each eventually had 3 Field troops.10

Moving onto the overall number in the Field Squadron (based on a 4 Troop Unit), while the Author states that it is 225 officers and Soldiers, this is an odd figure and there is only one set of figures that I have found that comes close to this number and I’m not convinced that this is how the figure was selected, but we’ll look at that in a moment.
Based on the Field Service Book 1914, the peace time and war establishment for a RE Field Squadron is 7 officers and 184 Men11.
This breaks down as follows:
Sqn HQ – 2 officers + 10 men
Field Troops x 4 – 1 Officer + 30 men each (4 officers and 120 men)
B Echelon – 1 Officer + 54 Men
So we have a full strength RE Field Squadron of 4 Field Troops of 191 personnel. this is some what short of the 225 number. The only figures that get close to this number is if you add the additional personnel of the assumed troop size of 1+40, but the establishment tables and the war diaries state that the Field Troops are 30 or less (at several points in the war Troop strength even gets as low as 18 men)
From the Field service book a RE Field Company is 11 officers and 211 men (Peace time establishment) and 6 officers and 211 men on War establishment.
The only other way that the numbers could have been made up is by taking the figures for an Indian Engineer Field Troop of 3 Officers and 56 men and multiplying that by 4 troops12, but I think this is the least likely method of calculating that figure. It is my view that the Author has use his original figure of 1 + 40 for each of the Field Troops and then added in the HQ and Echelon.

The author makes great reference to the fact that the Field Squadrons can only muster 70 men into the trenches to carry out engineering work. The author attributes this as a fact that the remainder of the Squadron is needed to look after the horses away from the Front. This reason is completely wrong and I will address this in a separate blog post as it deserves debunking, in a significant way, as it also appears as the rationale in a number of other arguments against the Cavalry as a whole. So bear with me on that point.
However I can explain and justify the figure of 70 men in the trenches. The figure of 70 men in the trenches regularly appears in 2nd Field Sqn RE war diary for Spring and early Summer 1915, it is also a figure that is briefly used for 1st Field Squadron RE in late 1914 while they are working in the trenches near Ypres. So up to this point the Corps History is correct, but we need to consider a couple of things. For the Field Squadrons this is a period of change and building up and development, going from a single Field Squadron and an Independent Field Troop to 3 field squadrons, which means that at times these units have been below strength while they each became established, on occasions even loaning complete Field Troops and equipment to allow the creation of the new unit. 13
More importantly the reason that you have this type of figure is not down to the number of people available but down to how a Field Engineering unit actually works:
A RE Field unit such as a Squadron or Company is a self contained unit that can be called on to carry out Field Engineering of a variety of forms and tasks, but to do this the unit has the Field Troops as the working or task delivery unit but anyone that has worked as a sapper or with sappers knows that engineering works consumes a significant amount of Engineering and Construction Resources.
So to keep the Field Troops supplied the Squadron has an Echelon – the In-Unit Quartermaster department that holds the big stores and equipment, and deals with demanding stores from Higher formation, either for specific tasks or as it’s own holdings are issued, expended or damaged. So the 1 officer and 54 members of a Field Squadron are not in the trenches, they are demanding stores and pushing the stores down to the Field Troops on the ground or in the Trenches. As a Echelon Commander friend of mine would regularly say “No War without G4!” and it is very true of the Great War, to deliver effect Sapper units consume engineering stores.
In addition the Echelon was providing a service to the wider Cavalry Division. All formations and units used horse drawn wagons, what happens when you have a damaged cart wheel, axle or body work of your horse drawn vehicle? Units would take it to the RE Field Squadron’s Echelon where the RE Tradesmen would carry out repairs – Wheelwrights, cart-wrights, carpenters and Blacksmiths. Right across all of the unit’s war diaries you will find the references to the repair work carried out to the Cavalry Division’s horse drawn vehicles, so the statement that “, and this left the remainder of the Squadron practically immobile and quite unproductive” is very much incorrect.
Also the Squadron HQ is not likely to be all in the trenches, the Command element may be in the trenches but the Administration element will be near but doing their job of administrating the unit particularly as it may have Field Troops with different Brigades and Divisions, and the orders from Division will need to come into a functioning HQ. So these guys are not realistically in the 70 troop numbers.
So that leaves the 4 x Field Troops. Now it is important to break down that number of 1+30 in each troop. A full strength Field Troop has 30 NCOs and men, this is made up of 23 Sappers (NCOs and Men) and 7 Drivers. The Drivers form the unit 1st line Transport and supply and it is likely that these men are not in the trenches on a permanent basis.
Why? The period that the RE Troops are in the trenches is usually between 14-30 days at a time, they are not rotating out in the same way the infantry are, these guys are working in the trenches for that full period. If they are working then they are consuming G4 Stores and they need regular resupply and that bringing forward of supplies falls to the 1st line transport and supply from the Field Troops. These guys are not sat on their arse back in the Echelon, they are bringing forward the equipment and stores ready for the next day/night of engineering tasks.
To that end with an upto strength unit you are looking at 92 NCOs and Sappers in the trenches but in the period of 1914/15 the Squardons are working working at 2 or 3 Troop strength and that is closer to the 70 figure.
Once the Cavalry Divisions are re-organised to create the Dismounted Cavalry Units for the Trenches in 1916 and 1917 what you find is that a Division can create a Dismounted Brigade – This is because a Cavalry Regiment is in man power terms half the strength of an Infantry Battalion. This is then matched by the Field Squadrons as they work on supplying a Dismounted Troop of 30 NCOs and Sappers to support a Brigade (also remember those cavalry regiments also have their Cavalry Pioneers – The RE Field Squadrons are still running these training courses and refresher courses to the Cavalry Units through out the war as well).
The last point I want to make about the 70 NCOs and Sappers that are working in the Trenches of 1914 and 1915, they are not ineffective or unproductive as the Chapter 16 Author suggests, when you read the War diaries of 1st and 2nd Field Squadrons during their time in the trenches, they are regularly supervising and managing working parties of between 700-1500 personnel which is not bad for a small unit, In my opinion that’s punching above your weight and delivering effect. But that isn’t by accident or simply being forced on the unit. This ability to manage large working parties was pointed out by Capt Cox14 as an essential skill of the Sappers and NCOs of the Field Troop, and the “Duty of Supervision” was highlighted as a requirement of the Field Troops by Sir Douglas Haig in his report on Cavalry Divisional Training of 1909.
In my view the 70 men of the Field Squadrons when dismounted and working in the trenches, are in the good old fashioned traditions of the Corps, a force multiplier and delivering a significant Engineering effect. I fully accept that they are a smaller capability compared to the 2 Field Companies (later increased to 3 Companies)in the Infantry Divisions but they are most definitely a productive and economical Sapper unit, and that 70 man dismounted unit was regularly producing Engineering Effect with Working parties of 1500 men.
OK, that’s the first of the rants over, time to catch my breath and get ready for the next one.

Notes and references:
1. The History of the Corps of Royal Engineers, Volume 5. (1952) Institution of Royal Engineers.
2. Chapter 16, The History of the Corps of Royal Engineers, Volume 5. (1952) Institution of Royal Engineers.
3. http://www.longlongtrail.co.uk – An excellent site for information on the Great War.
4. My view is that the Author has the view that the Squadrons would have been more productive and more mobile if mounted in lorries rather than on horse back. while the British Army at the time was embracing mechanisation more than the other armys, the all terrain capabilities of the lorry at the time was not great and the Lorry was viewed as an Logistic asset to be used at higher formation level – this will be a discussion post in the future. Also the Author does not understand the role and function of the Cavalry of the Great War. His view is that they were the “Shock of Impact” of charging horsemen, rather than the multi role capability designed to operate on the flanks, move rapidly to plug/ exploit gaps, carry out recce etc – again a topic that I will come back to in a separate blog post.
5. Colonel WH Evans DSO (1926) Brief History of the Royal Engineers with Cavalry in France During the War 1914-1918, RE Journal 1926. – this is a really good article split across 2 editions of the Journal in 1926, but it is as it suggests a brief history and while it gives some detailed info about Officers with the Squadrons it is a “Big Hand” overview. When you read this article and Chapter 16 you can see big chunks of the article lifted into the Chapter. The article gives a taste and should point you to specific areas of the war diaries.
6. Chapter 5, Section 156, Cavalry Training Manual (1915), General Staff, War Office.
7. Air raft Equipment, Section 7, Military Engineering Part 3B, Military Bridging. (1914), General Staff, War Office
8. Manual of Field Engineering (1911), General Staff, War Office.
9. Capt EW Cox RE, (1913), Field Troops – A lecture delivered to No 3 Senior Officers Class at the SME, RE Journal
10. War Diaries of 1st, 2nd, 3rd, 1st Indian & 2nd Indian Field Squadrons RE
11. Chapter 1, Page 9, Table 12 – War Establishments of Various Units, Field Service Pocket Book, (1914) General Staff, War Office.
12. Chapter 1, Page 9, Table 13 India -Cavalry Brigade, War Establishments, Field Service Pocket Book, (1914) General Staff, War Office.
13. Page 21, 25th Sep 1914, 1st Field Squadron War Diary, – 4 Field Troop and Equipment detached temporarily from 1 Field Squadron RE to help form 2nd Field Squadron, the Troop would return at the end of October 1914.
14. Capt EW Cox RE, (1913), Page 156, Field Troops – A lecture delivered to No 3 Senior Officers Class at the SME, RE Journal
The First RE Casualties of the Great War
Firstly I must give an apology for the lack of posts. however I have not been idle, there has been a lot of digging into archives and war diaries and planning for the coming spring and summer while I am here in Mons.
My last blog post focused on the blowing of bridges and crossings on the canals at Mons. In that post I highlighted the first Royal Engineer fatalities of the Great War – 2Lt HW Holt RE.
2Lt Holt RE was one of the Section Commanders (a Troop Commander in modern parlance) of 56 Field Company Royal Engineers. His Section was tasked to carry out the demolition of the bridge on the Rue Des Bragnons over the Mons Canal. This crossing connected the villages of Nimy (south side of Canal) with the village of Maisieres (North side of the Canal). 56 Fd Coy RE had the problem that they were ordered to not start the demolition work on the crossings until 0600hrs on the 23rd of August, despite being in location on the 22nd August. The Company was further hindered by the limited amount of explosives that they had in their possession.
By the time the Sections of the Field Company started their work to prepare the crossings for demolition it was clear that the German Army was a lot closer that anyone expected and the eastern crossing at Obourg were actively under fire from Germans on the high ground above the crossings.
At the Rue Des Bragnons crossing 2Lt Holt and his men had started their task to install the explosives on the bridge. At this time German troops had infiltrated into the village of Maisieres, and once they had suitable number they rushed the bridge and attacked the sappers as they worked. In the melee 2Lt Holt was shot and killed and 21 NCOs and Sappers were captured.
It is interesting to note that the 56 Field Coy RE War diary states that “Lt Holt believed to be wounded”.
I also feel it is important to clarify something that often causes confusion when looking at war documents such as War Diaries, when the term casualties are used it is not just deaths, it cover a number of categories:
- Dead
- Wounded
- Captured
- Missing
There is no other indication of other wounded or killed from 56 Fd Coy RE at the time.
To the best of my knowledge Lt AF Day RE of 57 Fd Coy RE is the second Royal Engineer fatality of the Great War, he received a head injury while attempting to get onto the Nimy Railway bridge to place charges. He would wait to the rear of the bridge in the vain hope that there would be a gap in the fighting that would allow him to get back onto the bridge unfortunately he would later die of his wounds while still waiting to get back onto the bridge. Again there are no other deaths listed in the 57 Fd Coy RE War Diary for the 23 Aug 1914.
So we have 2 RE Officers listed as being wounded and killed, the thing that is interested there are 2 other Sappers that are in the Military Cemetery at St Symphorien (East side of Mons) that died on the 23 Aug 1914. It is possible that these Sappers – Spr F Johnson RE and Spr H Rodford RE may be from 59 Fd Coy RE as they list “3 sappers lost wounded”. The use of the word “lost” in the war diary would indicate that they were left behind as the unit withdrew under fire and as such it is possible that two of them died of their wounds.
Coming back to Lt Holt RE, as stated, he was killed at the bridge at Maisieres and along with the infantry that were killed in the Nimy area it appears that they were initially buried in the village of Maisieres. There is a stone plaque at the village church, St Martins, that commemorates this fact.
Plaque on the side of St Martins Church, Maisieres St Martins Church, Maisieres. In 1916, The German Army decided that they wanted to create a centralised Military Cemetery for the area and with the agreement of a local Belgian Landowner, Jean De Lehaie, who provided the land at no cost on the proviso that the land would be used for the dead of both sides and “were commemorated with honour”. On 6 September 1917 the cemetery was formally opened by senior German Officers and several local Belgian Dignitaries, The German also placed a large obelisk on the high ground of the site to commemorate the dead buried in the cemetery.
After the Great War, the responsibilities for the Cemetery passed to the British and the Imperial War Graves Commission. As part of this process the British/ Imperial dead had their wooden crosses replaced with headstones, The British also added the Cross of Remembrance . Also between 1924 and 1952 efforts were made to bring in the dead from many of the local grave sites. it is during this period that I believe that 2Lt Holt’s body was moved from Maisieres.
With the lack of details of other casualties/ fatalities listed in 56 & 57 Fd Coy RE War Diaries I can only surmise that Johnson and Rodford may well be 2 of the wounded that were lost from 59 Fld Coy RE. The other Sapper units involved in the fight at the Mons Canal on 23/24 Aug 1914 were 17 Field Company RE who appear to only have one death – Cpl Marsden, killed at the Ghislain Railway Bridge, and 2&3 Field Troops of the Field Squadron RE who state no losses or wounded. (However the 17 Fd Coy RE War diary does not start until 27 August 1914).
The St Symphorien Cemetery has two other Sappers buried there, one is unknown and the other is from 1919.
I have still to locate where Lt AF Day RE and Cpl Marsden RE are buried, but that may well be a good excuse to get out for a few more local walks. As part of the research for this post I’ve come across the main CWGC cemeteries but I’ve also found it has been worth looking in some of the smaller village cemeteries as there are often the odd one or two military graves in them.
So there you have a bit of a follow up post on my previous blog post. With the weather starting to get better my aim is not to get out and start looking at some of the other battle sites from a Sapper perspective.
Blowing the Bridges at Mons 23/24 Aug 1914

Introduction
Having now arrived and settled into Mons, it has been a case of get out and look at the Great War History on my doorstep and it is pretty much on my door step.
There is a lot about the first and last shots of the war, and also the defence of the Canal and all of the actions that come with that – From a Sapper point of view the winning of 2 VCs for the actions on the 23 Aug is a big deal. But there is more to this, a lot more in fact and it also involves the Mounted Sappers of the Field Sqn RE.
Depending on what book you look at or who you talk to there are between 18-22 “bridges” across the canals that formed the BEF line of defence on the 23-24 Aug 1914.
Why the difference in numbers?
The canal had road bridges, rail bridges, foot bridges, locks, locks with bridges and some double bridges (bridges over the canal and directly linked a second bridge over a smaller drainage canal/ channel on the south side). With reference the locks not all were classed as a crossing -even though it would be possible for men on foot to cross. So you can see that there is a whole range of Structures that cross the Canals and offer a means of access from one side to the other.
I will look at what happened to them and who had responsibilities for them. I’ll go through the actions at the bridges moving East to west as that generally matches the the actions with the enemy as they approached the canal line.
Points to note
One of the points that is clear from reading the accounts, the war diaries and also some of the reference books is that there is not enough explosives held by the Sapper Field units for the task at hand, that becomes very clear as soon as the various units see the task at hand.
- A Field Company RE would have 560 Slabs of wet Gun Cotton (1 lb each) and 720 primers (1 oz dry gun cotton packages)
- The Field Sqn RE would be better provided for with 1120 Slabs of wet Gun Cotton (1 lb each) and 1920 primers (1 oz dry gun cotton packages),
It is also noted that while the Officers and Sappers of the units know demolitions and have been trained in it, they are not well practised in it. This is pointed out by Lt Gen Buckland in his 1932 article for the RE Journal and Capt EW Cox RE’s lecture to the Senior Officers Course at the SME, Chatham and recorded in the RE Journal Sep 1913. Cox points out that during the pre war exercises of 1911 the Field Troops are well practised in Water Supply and River Crossings, the demolition tasks tended to be cutting railway lines rather than bridge demolitions but are not close to be experts n the task.
Cox also pointed out that the quantity of explosives held by the Field Troops was too little and that there was no first line resupply – it would be interesting to know if his recommendation of a 100% resupply of demolition stores be carried with the Artillery Battery ammunition supply in each Brigade was ever taken up.
Another thing to note is that the view of the French Commander, General Joffre, was that this was going to be an “offensive” operation and as such no demolition plan was developed by either the British or the French in the event that they may have to withdraw, this failing cause a lot of problems for the BEF as it retreated from Mons back into France.
The last point to note is that in Horsfall & Cave’s book “Mons 1914” they state that just prior to the outbreak of war that a fault is identified with the in-service Instantaneous Fuse and it is withdrawn from service and only limited replacements items were available. As such the RE Field units had to rely on the Electric Exploder equipment of which there was only one per Field Section (remember this is a 40 man troop in modern parlance) and per Field Troop, and Safety Fuse. I have to state none of the other references mention this, I had hoped that the RE History Volume 5 may mention it but it doesn’t, but bearing in mind it was written in 1953 from war diaries, notes and memories, it doesn’t surprise me, but to support this every reference talks about the exploder and safety fuse and no mention of instantaneous fuse. it’s not mentioned in the war diaries as the equipment recall occurred just prior to the declaration of war, which is the marker for the start of unit war diaries.
3 Division’s Area – Obourg, Nimy, Jemappes and Mariette.
The Canal area that covered Mons (the Eastern and Northern side)was covered by units of 3 Div, this was also the responsibility of the 2 Field Companys Royal Engineers of that Division:
- 56 Field Company Royal Engineers
- 57 Field Company Royal Engineers.
56 Field Company RE covered the Eastern Crossings from Obourg round to Nimy. When given the task the OC of 56 Fld Coy RE he carried out a recce of the crossings and quickly identified that he did not have nearly enough explosives to deal with the types of crossing points. He dispatched men into Mons to try and get more explosives either from Military or civilian sources. He was also told that he was not to start any demolition work until 0630hrs on the 23 Aug 14.
Unfortunately by the time that 56 Field Company sappers move upto the crossings and bridges the Germans were already pressing down on the 3 crossings in the Obourg area.
*A Personal Take – while it could be said that the crossings could have been prepared with the unit holdings of explosives there were a number of factors that should be considered.
All of the crossings are substantial items of engineering and would need a significant quantity of explosives.
The limited availability of Fuse Instantaneous and the numbers of electrical exploders made the task difficult.
The time at which 56th Fld Coy were tasked was late and the Germans were already pressing down so that the demolitions would need to be “hasty” demolition tasks rather than “deliberate” and as such they would require significantly more explosives to achieve the required effect. (According to the Field engineering manual 1911, hasty demolitions should add a factor of 50% onto all calculated explosives)
The crossings that 56 Fld Coy RE had to deal with in the 4th Middlesex area were:
- Lock No 4
- Road Bridge to Obourg, next to the Railway station.

Road bridge at Obourg Station. - Lock No 5
In some cases the locks on the Canal do have a bridges incorporated, but for some they do not but can still provide a crossing point for infantry when they are in the closed position.
Due to the weight of fire from the Germans on the eastern bank and the high ground it was not possible to prepare any these crossings for demolition and all of the crossings were captured intact.
Moving up into the 9th Brigade area at Nimy there were a further 4 crossing points that were also the responsibility of 56 Fld Coy RE.
- The Bridge on the Rue Des Bragnons. This Connected the villages of Nimy and Maisieres. This was a lifting bridge with the lifting gear on the Maisieres side (Northern Bank/Enemy side).
- Swing Road Bridge at Nimy

- Nimy Railway Bridge. This was a metal construction bridge.
Lt Holt RE and his Section (a Troop in modern parlance) were attempting to install demolitions onto the Rue Des Bragnons Bridge when the Germans rushed the bridge. Lt Holt was shot and injured and his section was captured. Lt Holt soon died of his wounds and has the unfortunate claim to fame of being the first Royal Engineer to be killed in the Great War.
The next 2 bridges (The Swing Bridge and the Railway Bridge) were the responsibility of Lt AF Day RE and his section. Lt Day did not have enough explosive to destroy both bridges. The swing bridge had been rotated open and secured on the South Bank (Nimy) and the metal railway bridge was being defended by Machine Guns of the 4th Royal Fusiliers.

Lt Dease & Pte Godley of the 4th Middlesex defend the railway bridge, Dease would die of his wounds, both were awarded the VC. Both bridges were under heavy enemy fire and Lt Day took cover with the hope that the opportunity may present itself to allow him and his sappers to get onto the railway bridge to install the demolition charges. Unfortunately there were no opportunities and Lt Day was wounded and soon after was captured once the Germans crossed the bridges.
The Germans captured both of these bridges intact.
The last of the crossing points in the 56 Fld Coy RE area was Lock No 6, having read several accounts there is no suggestion that this lock had any form of bridge, so the assumption is that this was just a lock and would have been simply opened with the mechanism either locked or damaged to prevent closing.
The next series of crossings were allocated to 57 Fld Coy RE.
- The Ghlin Road bridge (1000 yards west of lock No 6)
- Railway Bridge (500 yards west of the Ghlin Bridge)
Both of these bridges were the responsibility of Cpl A Payne and 6 sappers. On both of the bridges charges were laid but due to not having an electric exploder they would both require to be initiated using Safety Fuse. This created its own particular challenge as it required the bridges to be initiated with equal lengths of safety fuse. Despite this challenge Cpl Payne and his sappers successfully destroyed both bridges. (Note- the reason why the safety fuse needed to be of an equal length is that if one side detonates before the other side there is a chance that the blast would shift or blow the other charges off the structure before they detonated, the result would mean a partial demolition)
Moving on into the next battalion area – 1st Royal Scots Fusiliers, this is the start of the Conde Canal and the Battalion had a 2000 yard frontage of canal to defend. This was still 57 Fld Coy RE area of responsibility.
The Crossings are:
- Lock No 1
- Lifting Road Bridge at the Gas Poste
- Lock No 2, this has a bridge crossing as part of it’s construction.
- Lifting Road Bridge at Jemappes

the Lifting Road Bridge at Jemappes in the open position 
Lifting Road bridge at Jemappes in the closed position Lock No 1 had no bridge and as such it was opened and fixed in position.
the Gas Poste lifting road bridge was prepared for dems by Lt Boulnois RE and Sgt Smith and successfully blown using the Section’s Electric exploder. With this bridge destroyed, Lt Boulnois and Sgt Smith dashed onto deal with the other bridges.
Lock No2 was being dealt with by LCpl Jarvis and his sappers and some of the Royal Scots Fusiliers, at this time they were under fire and Cpl Jarvis ordered his men to get back while he finished fixing the charges, working from a row boat he was assisted by Private Heron of the RSF. Despite the enemy fire the charges were set and Jarvis completed the demolition. For this action under fire he was awarded the Victoria cross and Heron was awarded the DCM.

An artists impression of Jarvis fixing charges on the Lock no 2 bridge but it seems to have omitted Private Heron who was working the boat for Jarvis. while this was going on the 3 Div CRE’s adjutant – Capt Wright RE was helping the sappers by moving stores and explosives using his motor car, having met with Lt Boulnois and Sgt Smith after they had blown the lifting bridge they made a decision that Sgt Smith would take the Electric Exploder and a drum of cable and go with Capt Wright to deal with the Lifting bridge at Mariette in the next battalions area, while Lt Boulnois would head to the Lifting Road Bridge at Jemappes.
The Jemappes bridge had been prepared by Cpl Halewood and his sappers, the limited availability of the electric exploders meant that Sapper ingenuity had come into play. several of the houses in Jemappes near to the canal had an electricity supply and between Cpl Halewood and Lt Boulnois it was worked out that they could wire the demolitions into the lighting circuit of one of the houses and by quickly flicking on the light they could provide a suitable power source to set off the explosives. As the last British troops crossed back over the bridge under German fire Lt Boulnois flicked the switch at the very moment that the power to the village failed. The bridge could not be blown and The Sapper dems team had to withdraw with the infantry.
The last bridge in the 3 Division area was in the Northumberland Fusiliers area
- Lifting Road bridge at Mariette.
This was a double bridge as at various sections along the south side of the canal there was a deep drainage channel. The canal bridge was 60′ wide with the lifting mechanism on the northern bank, and the bridge over the drainage channel was 20′. The canal bridge had been prepared for demolition with the electrical wires on the tow path.
below is a sketch map taken from the Northumberland Gunner Website showing the layout of the Northumberland Fusiliers in Mariette and the position of the bridge, tow path and the drainage channel.

http://northumbriangunner.blogspot.com/2014/03/mons-mariette.html
The bridge was under heavy fire and it was necessary to connect the cables on the tow path with the cables, that Sgt Smith had brought with him, to the electric exploder. To do so would mean being exposed to enemy fire, so Capt Wright attempted to cross the drainage channel bridge from underneath by going hand over hand from the girders. unfortunately a head wound sustained earlier when he was near LCpl Jarvis’s demolition site had severely weakened him and after several attempts he fell into the drainage channel and had to be rescued by Sgt Smith. Unfortunately the bridge couldn’t be blown and Smith and Wright were forced to withdraw with B Company of the Northumberland Fusiliers. Wright would receive the VC for his efforts on this day.

An Artist’s take on Capt Wright trying to connect the wires to the charges – Clearly the artist was more familiar with English canal bridges than those on the Mons-Conde Canal. 
Another Artists impression of Capt Wright’s efforts, but equally created with a bit of poetic licence. 5 Division’s Area – St Ghislain, Les Herbieres, and Pommeroeul
This Division area was the responsibility of the Division’s 2 Field Companies:
- 17 Field Company RE
- 59 Field Company RE
The first section of the Canal in the 5 Div area was a 3000 yard stretch that was the responsibility of 1st Bn Queens own Royal West Kents. This section covered the small town of St Ghislain and had 3 Bridges, these were the responsibility of 17 field Company RE
- Fixed Iron Railway bridge

- Bridge at Lock No 3

- Lifting Road bridge

The 3 bridges in this area had been well prepared for demolition but they were finished while under direct fire, but by the evening all charges were secured and the cables running back to a well placed firing position However but the railway bridge came under shell fire and some of the gun cotton charges were blown off from the beams and girders. Cpl Marsden attempted to fix them back in place but was killed before he could finish the task. 2nd Lt Godsell and Sgt Payne detonate the demolition with the electrical exploder and the bridge is successfully blown.
The bridge at Lock 3 is blown by Cpl Gerachty and the heavy iron lifting road bridge is successfully blown by Cpl Taylor.
the next section of canal is a 1000 yard frontage and manned by the 2nd Bn KOSB, this has one bridge at Les Herbieres.
- Iron Road bridge at Lock No 4
this bridge is prepared for demolition by Lt Pottinger and his section of 17 Field Company RE. The order to blow the bridge is given and the Electrical Exploder fails to function. after several attempts it is realised that the exploder has a fault inside and it isn’t possible to now attach safety fuse. However this doesn’t stop Lt Pottinger attempting to shoot that the detonators with his webley in the hope that that may set of the explosives. this wasn’t an act of desperation as such, as Lt Pottinger was an Army champion shot with the revolver. Unfortunately his efforts came to naught and the bridge had to be left intact while the Sappers and Infantry withdrew under fire.
17 Field company RE also sank an number of canal barges, using 1 lbs of gun cotton at the keel, to prevent them being used as improvised crossings.
The next section of canal was in the responsibility of 1st Bn East Surrey Regt of 14 Brigade and the bridges were the responsibility of 59 Field Company RE. there was 2 bridges in the Surrey’s area and these were the responsibility of 1 Section under the command of Lt Pennycuick RE
- Fixed Railway bridge (Plate Girder construction)

- Double Road Bridge – a Fixed bridge over a drainage channel and a lift bridge over the Canal, known as the Pont D’Hautrage

Both of these bridges were successfully blown, from all of the references and articles there is no mention on how these were detonated or whether they were under fire.
The final section of the 5 Div area was defended by the 1st Bn Duke of Cornwall’s Light Infantry. There were 2 bridges on this section of the Canal and they were the responsibility of Lt Flint and No3 section of 59 Field Company RE.
- Lifting Bridge on the Pommeroeul to Thulin Road
- Wooden Bridge at Lock No 5.
While these bridges were being prepared for demolition the CO of 1 DCLI voiced concern that his battalion may end up being stuck as there was a small river that ran parallel with the canal, approximately 600 yards to the south. To lessen the risk a section from 59 Field Company RE build a pontoon bridge to provide a crossing for the Battalion.
The problem that Lt Flint and his sappers had was that their bridges were under direct fire from a German Field Gun situated a mile to the north of them. despite this, both Bridges were successfully blown. The Pontoon Bridge provided a key lifeline for the DCLI but unfortunately it could not be stripped out as time did not allow and had to be destroyed to deny the Germans a crossing point.
19 Brigade Area – Pommeroeul to Conde
The area west of Lock No 5 across to Conde was initially covered by the regiments of the Cavalry Brigades, they had pushed forward and the Brigades were supported by 2 & 3 Field Troop RE of the Field Squadron RE (Note – it was not numbered at this point as it was the only RE Field Squadron, it would be another 2 weeks until 2nd Field Squadron was created and at that point it would take on the number of 1st Fd Sqn RE)
the cavalry would be relieved by Infantry of 19 Brigade at about 1530hrs on the 23 Aug, this would allow more of them to push forward to recce and to engage the Germans. The Field Troops had responsibility for 5 Bridges which they had been preparing for demolition for most of the afternoon. 3 of the bridges were to the south of Pommeroeul and the other 2 were further west at the village of St Aybert.
Pommeroeul –
- A Lift Bridge over the Canal
- slightly west of the above bridge – A metal Lift Bridge over the Canal
- Wooden bridge over the river just to the south of the above bridge
St Aybert –
- A Lift bridge at the east end of the village
- A Girder Bridge in the middle of the village
by 1530hrs B Company 1st Middlesex Regt had moved up to the Canal and were now in place and supporting the RE Troops working at the bridges.By 1630hrs the Bridges were under heavy fire from the Germans of 8 Division. The eastern bridge is not destroyed until British cavalry units have returned over it and it is blown at 1715hrs with the other 2 Pommeroeul bridges destroyed shortly after.
The bridges at St Ayberts are held for longer to allow the 6th Dragoons Guards to withdraw over the Canal. The last of the 6 DG cross the Bridges at about 0230hrs on the 24th Aug and the Field Troop blows both bridges at 0300hrs. Both Field Troops withdrew back to the Sqn HQ at Quievrain and would then start the Retreat.
The current Girder Bridge at the same spot of the Girder bridge destroyed at 0300hrs 24 Aug 1914 by one of the RE Field Troops Conclusion
This has been an interesting project to dig into, particularly as it has such an important part played by 2 Mounted Sapper Units, of which I’ll do a bit more of a detailed posting. As for the other units it is interesting to see that there is a real mixed bag of results.
That isn’t a criticism, every unit was carrying out demolitions while under fire, with not enough explosives, limited electric exploders and next to no instantaneous fuse. Add to that the order for 56 Field Company RE not start preparing Demolitions until 0630hrs on the 23rd Aug – a whole night lost, and then the enemy were were on top of you before you start!
I’ve tried to get as many old photos of the bridges as I can, and when you look at the range of bridge type, construction and materials it is clear that that the Sappers worked bloody miracles with the resources and time available to blow as many bridges as they did. There has been a real mix of bravery and madness to be found as you move from each bridge and lock.
Hopefully I’ve managed to add a bit more to the Battle of Mons than the usual stories of the first shots of the Great War and winning of the first VCs of the war (not to take anything away from those stories) but I wanted to look at a very sapper aspect of the battle.
References:
RE Field Sqn War Diary 22 Aug 1914 – 1 Sep 1914
59 Field Coy RE, War Diary, 22 Aug 1914- 1 sep 1914
Capt EW Cox RE “Field Troops – A lecture delivered to No3 Senior Officers’ Class, SME” The Royal Engineers Journal, September 1913
Maj Gen Sir Reginald Buckland “Demolitions Carried Out at Mons and during the retreat, 1914”, The Royal Engineers Journal, March 1932
2Lt KB Godsell RE (17 Fld Coy RE) “The First Month of World War 1 – extract of Personal notes jotted down by the wayside”, The Royal Engineers Journal, March 1974
Jack Horsfall & Nigel Cave ” Mons 1914″, Pen and Sword Publishing, 2000
David Lomas, ” Mons 1914, The BEF’s Tactical Triumph” Campaign Series, Osprey Publishing, 8th Impression 2008
Jon Cooksey & Jerry Murland ” The Retreat from Mons 1914: North, Casteau to Le Cateau”, Battle Lines Series, Pen and Sword Publishing, 2014
Andrew Rawson, “British Expeditionary Force, The 1914 Campaign”, Pen and Sword Publishing, 2014
“The History of the Corps of Royal Engineers Volume 5, The Home front, France, Flanders and Italy in the First World War”, Institution of Royal Engineers, 1952.
“The Royal Engineers Field Service Pocket Book” Third Edition, The Royal Engineers Institution, 1916
General Staff, War Office, “Manual of Field Engineering, 1911” HMSO, Reprint 1914
General Staff, War Office, “Field Service Regulations Part 1, Operations, 1909”, HMSO, Reprint 1914
General Staff, War Office, “Yeomanry and Mounted Rifle Training Parts 1 and 2, 1912” HMSO, Reprint 1914
General Staff, War Office, “Field Service pocket Book, 1914 with Amendments 1916”, HMSO, 1917
Preperation for Moving to Mons
I’m down to a month until I move to my new job in Belguim and the accommodation that I’ve been allocated puts me right next to so much of the history of August 1914.

So what is the plan? While I will be coming back to the Estate on a regular basis, one of the first plans is to look at what the movements and the routes were of the RE Field Sqn of the Cavalry Division.
The Squadron had responsibility for 3 bridges over the Canal to the west of Mons, which were blown. for the next few days they then moved back with the Cavalry eventually ended up south of Le Cateau before reforming with the Cavalry Division.
A lot of the work they had been tasked with during the retreat was Demolitions, creating Cavalry tracks to improve mobility and also fortifing villages to provide defensive positions for rear guard units to hold back. delay the advancing Germans.
It is going to beinteresting to see, using the war diaries as the guide, what the distances that were covered and also the route.
Rest asured there will be photos and also a post showing what I find on the route.
The Origin of the Garrison Engineer
As many of you know I am a Garrison Engineer (Construction), which is basically a commissioned Clerk of Works (Construction). But what is the origin of the Garrison Engineer?
The general practise of the 1700s and early 1800s was to keep a small standing army and to increase the army’s size in times of war. Most of these troops would be billeted with the local population and then demobilised after the war. After Waterloo the army was reduced back down but was bigger than it had been prior to the peninsular war. The intention was that with this force they would build some barracks to accommodate the soldiers and therefore reduce the burden on the local population. The construction of these barracks was mainly put out to civilian contract.
In 1828 the Barracks question was raised in Parliament by Sir Henry Hardinge, the Clerk of the Ordinance who stated that he was not of the opinion that it was economical to employ Civil Architects rather than Military Engineers.
He considered that the construction and maintenance of barracks could be carried out more economically by Officers of the Royal Engineers than by any system of Civil Architects and (civilian) Clerk of Works.
The Royal Engineers were then tasked to build and supervise the construction of barracks across Britain. A system of District Engineers (Lt Colonels and Majors) was established and the view was that Engineer Officers that were stationed in Britain in RE battalions and companies should be tasked to work for the District Engineer, the view taken was that this would be an excellent opportunity for the Engineering Officer to learn the skills they would need on operations/ campaign when sent overseas.
The District Engineers would be assisted by Sapper Draughtsman and Engineer Clerks, later they would also be assisted by Military Foreman of Works (the forerunner to the Clerks of Works (construction) – The first course started in 1839 I believe, I aim to research into that a bit more).

An example of the type of work undertaken is that of the construction of Fulwood Barracks at Preston, this was designed and managed by the Royal Engineers using the District Engineer organisation. The Building works were commenced in July, 1842, and the first stone was laid on the 28th of August, 1843, and being completed by 1848. The entire cost was 137,921 pounds, 2 shillings and 10 pence. During my time at Fulwood it was always pointed out that the build was delivered on time but went £100 over budget. (by modern standards a 0.07% overspend seems a bit of a bargain to be honest!)

Fulwood Barracks main entrance As we move forward it was felt that there was a need to increase the assistance to the District Engineers, which by the 1880’s were being referred to as the as CRE’s (Commander Royal Engineers) as they had command over the RE units in their districts.. A Royal Engineer review of 1885 made a recommendation to create and an additional 8 Quartermasters for the Corps of Royal Engineers.
At this point in time there was only 6 Quartermasters in the Royal Engineers, the additional 8 Quartermasters would see 2 become added to the existing Quartermasters while the other 6 would be promoted from Military Foreman of Works who were Warrant Officers. The selected Warrant Officers became “Quartermasters of Works Services” and they would be allocated to Districts to assist the CRE and Division Officers in the construction and maintenance of Barracks and Garrisons.
Quartermasters at this time were given honorary rank of Lieutenant on first appointment and then promoted Captain after 10 years of service, promotion to Major was by selection. A Quartermaster was required to retire at age 55.
After that first initial 6 Quartermaster of Work Services in 1885 they were increased in number to 49 by 1914.
While I still have more digging to do to see what the expansion was for the Quartermasters of Works Services and Military Foremen of Works was during the Great War.
The next part of the research is to understand how and when the QM of Works Services progressed onto become the Garrison Engineer. I have some articles and information that show Garrison Engineer appointments existed in India as part of the Military Engineering Services and also in the Salonika Campaign but these posts were for Senior RE Officers (Majors or Lt Colonels) or Senior Civilian Engineers. So more research needed and I have a feeling this is going to require looking in lots of RE Journal articles and perhaps contacting the Indian Army Sappers.
Busy but still here

Just a very quick update on what is happening. At the moment work and home life is very busy so the work on articles has slowed down. Life on the “Estate” is in the summer busy phase with hay making at the moment and at work I’m starting to prepare for my next posting.
Now that doesn’t mean that things will slow down drastically as the new posting will allow me to do more posts as well as the ability to get out on the ground out in Belgium and France to go looking at the various battlefields.
so please bear with me as at the moment I have a stack of articles in the draft file being worked on or waiting editing.
In the mean time go have a brew and I’ll be with you shortly………

The Officer’s Kit
We are used to seeing modern officers wearing a Sam Browne as a piece of parade kit but during the Great War this was the equipment worn by Officers of all types of units as field equipment. The Officer of the time would be expected to carry a variety of equipment in the field and this changed as the war developed . With this post we are going to look at a couple of different set ups and also how I have developed my kit over the years and also to mention where there are differences in kit and why .
(I also recognise that there were officers sets of 1908 equipment and that officers would at times wear soldiers kit when in the trenches, but the plan is to focus on the type of equipment that would be seen across the war period using the Sam Browne as the principle field equipment.)

CO and Senior officers of the Cameronians Aug 1914 The Sam Browne. Having progressed in my career to being a Warrant officer and then onto being an Officer I have worn a Sam Browne as part of my dress uniform. For the Warhorse ride in 2014 we were provided with uniform but needed to use our own Sam Browne to complete the impression of an early war mounted Sapper officer. While I had been issued with a Sam Browne I also had a cheap copy that I used for horse riding competitions that I had been taking part in as a Army Warrant Officer, I used to compete in Dressage and Show Jumping at novice and inter unit/ station events (not bad for a late comer to this horse riding milarky). This copy was perfect for using on the Warhorse event and also to use as my basis for my RE Officer impression for future events.

The Engineer Training Manual (Drill) has been a really useful document as it defines the kit to be worn/ carried by Officers and Soldiers in the field, this has helped me to refine my kit for the different roles and periods of the Great War.
Single cross strap. The basic set up is the Single Strap Sam Browne with the addition of the leather holster and ammunition pouch for the webley revolver. While on the Warhorse 14 event I also had my sword attached to the sam browne, this was quite common Pre War and in the very early stages of the Great War, but became less common after September 1914. Where I don’t have the sword frog fitted I will normally have the holster on the left hand side. This set up is also the one that I have when I’m on horseback.
This configuration works well and is quite well balanced on the belt and so long as the cross strap is adjusted for load carrying and not for parades it works well. One of the things that I have done with the ammunition pouch is to work out what the weight would be of 12 rounds of .455 pistol ammunition and then add that weight in the form of penny washers in a taped package, this adds an appropriate weight and helps to fill the pouch out appropriately.
Double cross strap. The double strap Sam Browne is stated as the configuration required for field wear by the RE Training Manual. The reason for this is to help to balance the load on the body. The second strap is normally fixed to the front right hand side of the belt by one of 3 methods.
a fixed ring on the belt, either stitched, riveted or both.
a leather loop with a ring, that slides onto the belt
a ring on the back of the holster. (this is the version that I use).
Having regularly worn this set up it is very balanced and even with the added binoculars and case means that it does allow for the equipment to be carried comfortably both when on foot or mounted. The one issue to watch however is to ensure the holster is sufficiently back on the belt that it doesn’t dig in when riding.

An extract from a manual showing the components of the Sam Browne Belt only. It was not unusual to see officers, when away from the front just wearing the belt of the Sam Browne. While it was a part of the dress regulations for officers to wear a belt with their jackets, the main people that you see in photos with this arrangement is that of Generals (possibly as they were photographed more frequently?).
Sword Frog. I have 2 modern sword frogs and I’ve used these in two ways, the first is to wear on the Sam Browne as required by the regulations but I’ve also used the second frog to be attached to the my Staff Saddle. This would allow me to switch the sword from my belt to saddle for ease of riding. On the War Horse 14 ride I did carry my 1897 pattern sword on the belt even when riding, which was fine but there was times when it was an embuggerance and from that experience I now always aim to carry the sword on the saddle, either using the loop on a shoe case or by using the spare sword frog.

Sapper Officer with Sword Frog on Sam Browne but sword fitted to horse shoe case. 
On the Warhorse ride and sword carried on the Sam Browne. One of variations that you can find is the Cavalry sword frog which has a slightly larger leather back, this was to provide protection to the Officer’s uniform from rubbing from the sword hand-guard. This type of frog can also be used on the officer pattern saddles.

Mk 1 Cavalry Sword Frog Pistol Holster and ammunition pouch. The standard pistol was the .455″ webley, of a number of variants, but from 1915 onward the principle pistol was the Mk6 Webley. These pistols would be carried on the belt in an angled leather holster. This could be worn on either side of the belt.
The position of the pistol was initially stated as be carried on the right hand side of the belt, but around 1911 the cavalry issued a directive that the holster should be worn on the left hand side.
The rationale was that with the Sword Frog on the left it was too cramped/ tight to have the pistol holster added to the left. However with the cavalry carrying the sword on the saddle it meant that there was space on the belt on that side and the holster should move to allow for easier access and cross-drawing of the pistol. both in mounted and dismounted roles.
When not in the field and as the war progresses you do tend to see the holster becoming more usual on the right hand side.
For my set ups, for single strap Sam Brownes I will have the pistol and holster on the Right Hip and ammo pouch on the left side. With the double strap I have the holser on the left with the ammo pouch on the right side of the buckle.
The Additional Equipment:
The Watch. By rights an officer of the Great War was expected to have a wrist watch, and for that purpose I have a couple of old style wrist watches that I use, generally plain with a brown leather strap. But in addition to that I also have a pocket watch with chain that I have added. The reason for that it would fit with a pre War officer to be using a pocket watch, also my Early War jacket has a small pocket specifically for a pocket watch, so why not.
The Satchel/ musette bag. Just as soldiers are required to carry their personal field kit on them so does the officer. These would have been a private purchase by the officers and would have come in a whole variety of types and styles. The bag on the left of the photo below is often referred to as a Officers Musette Bag and was designed to be worn on the shoulder strap or by clipping to the loops on the Sam Browne belt were the Sword Frog attached.
The musette bag is a great bit of kit and works well when carried on the shoulder strap, however when you use it clipped to the Sam Browne it does have the habit of pulling down on the belt. Having tried this with a single strap Sam Browne several times it was not brilliant to wear so I tend to now wear it using the shoulder strap. It will be worth trying it again with a double strap set up and with pistol and equipment on the opposite side to try and balance it out. The photo of the senior officers of the Cameronians in August 1914 show several of them with this style of bag fitted to the Sam Browne without pulling the belts down so it probably is down to getting the balance just right on the belt.

Musette bags clipped to the Sam Browne sword Frog loops – with the sword and without. The other bag is an old satchel that I picked up cheap but it allowed me to have an alternative, it was possibly an old fishing kit bag but for an officers satchel for the Great War period it fits really well.
Waterbottle. Until recently I would use a 1903 pattern waterbottle carrier and kidney shaped waterbottle with my set up. While using a 1903 pattern set up isn’t wrong it was more often the Indian Pattern waterbottle that Officers would have carried. Again this was a private purchase item and while the shape of the bottle was standard, the carrying harness/ strap would vary. The Indian Pattern waterbottle was slightly smaller in height to the kidney shaped bottle but was wider, the other main difference was that it was made from aluminium rather than enamelled metal (however I believe that some pre-1900 versions were enamelled steel).
I tend to use a 1903 carrier and waterbottle for riding events as the strap can be worn in a way that has the bottle very secure under the arm when riding, rather than bashing about on your hip or side. If I was doing an Officer of a foot unit then the Indian Pattern would be the first choice.
Binoculars. I have 2 sets of binos from the period, ideal for a Sapper Officer to have when on recce or just to keep an eye on what the Chaps are upto! Both came with cases that were in poor order but have now been repaired. One set is for wearing on a strap across the body and the other has loops to wear on the Sam Browne Belt.
Compass case. There is nothing more dangerous that a Officer with a map and a compass….as the saying goes. There are 2 types shown below. The smaller “pocket watch” looking item is a trench compass and is original. It is fully working and does appear like a pocket watch, its a nice bit of kit and when fitted with a watch chain is very easy to use when on horseback.
The other compass is a reproduction of a marching compass, very similar to the prismatic compasses that most modern soldiers would recognise and use. Again easy to use once you’ve been taught and very accurate. This is carried in a leather case and that would be either on a leather strap over the shoulder and across the body or it would have a clip and again attached to one of the loops on the Sam Browne.
Greatcoat carrier. Officers would carry a cold weather coat, either a great coat, trench coat or mackintosh either in carrier with a shoulder strap or with a set of straps that would clip to the Sam Browne cross straps. Examples that I have seen often replaces the greatcoat with rolled blankets or combinations of the all of the items. The only issue that I would say with the straps that clip to the cross straps is that this would be difficult to take off or put on without assistance or fully taking off the Sam Browne.

Both types of Carrier shown – fixed to cross straps and one on the shoulder strap This is the a reproduction item from Military History Workshop and is really useful to carry my trench coat. I’m currently having an old and damaged Greatcoat repaired and converted to a Pea Coat and this will be carried using the carrier. neither of my Sam Browne have attachment loops on the rear and I want the convenience of being able to drop kit off with the minimum of fuss.
When mounted the Greatcoat/ trenchcoat can very easily be strapped to the rear of the staff saddle without removing it from the carrier.
Map Case. There are several types of map case that are seen used by officers and these would have been either worn on a leather strap across the body or for the 3 fold pattern case that could be clipped to one of the lower brass rings on the Sam Browne belt.
The one which I use is an original leather case with clear panels marked with a a grid. This case is worn by using a leather strap across the body. However it is a really good to use when on horse back as the clear panel does allow the map to be read very easily and I strap it to the front of the saddle wallets to keep it close on hand.
The 3 fold map case that is seen below is an original from the interwar period and is in need of some repair work particularly the leather work (a project for later this year). This type of map case is seen with both Mounted and foot officers and could be worn on a strap across the body or clipped to one of the rings on the Sam Browne.
Whistle Pouch. The whistle is such an iconic item of the Great War with Officers using it to initiate going over the top, but it also was used for other signals as well. This would be carried by officers, either in a pouch on the cross straps of the Sam Browne or attached to a pocket by a leather tab or length of cord.
Realistically this would be an important item for Platoon/ Troop/ Section officers and for Company Level officers as well. As someone that generally is kitted out as a mounted Major it’s an item that generally I’d keep in a pocket. When doing a RE Field Company officer (on Foot) then I would add it to my Sam Browne.
I suggest that you go to the Highland Subaltern’s youtube site (twitter @1914Subaltern), Ruadhán’s has an excellent video on the use of the Whistle and the signals on his Youtube site, follow the link below – If you haven’t subscribed to Ruadhán sites then you are missing a trick.
https://www.youtube.com/watch?v=q5cJkmkMLHw
Summary. You can see there is a lot of kit that can be worn and carried by an Officer. The advantage is that it can be adjusted to suit the job at hand but the downside is that potentially the young officer would look like a christmas tree with so many things hanging off him. There would be a need to test and trial what works and how to configure your kit, For me I have to think if I’m spending time in the mounted role or on foot as with many things with soldiers equipment, once you have spent time in the field with the kit you adjust what you carried and how/where you carried it to be effective and comfortable. So the next time you look at a Sam Browne on parade consider that it is actually an item of field equipment.

References:
http://www.karkeeweb.com/patterns/officers/sam_browne.html
Royal Engineer’s Training Manual (Drill), 1929.
The Highland Subaltern’s Youtube site – https://www.youtube.com/channel/UCh3mJKJl8rzm2RmiqGMjiDw
Web site relaunch

Morning Everyone, I’ve finally managed to get the website moved from it’s previous domain and on to the new platform.
Hopefully we are now visible to the world again.
The move was mainly based on cost and also the old provider viewed the site as something that should be a business rather than a blogging site and somewhere that I through out some of my history research, Living history events and horse/mule riding activities.
It has taken a little bit of time to move things over onto this platform but I think it’s all sorted, but I’m sure there are going to be a few glitches. if you spot any let me know and I’ll aim to get them fixed/ sorted out.
Regards
Will
The Loaded 1902 UP Saddle

If you horse ride the chances are that you would have ridden a General Purpose (GP) saddle, these are designed to cover most types of activities that a modern rider would possibly participate in. These saddles tend to be comfortable, robust and ideal for the Manege and a hack out, that comfort is for both the rider and the horse. When modern riders look at the basic nature of the military saddle their first reaction is “bloody hell! that looks uncomfortable!” but that is anything but the case. I’ll now take a look at the UP Saddle and the way it would have been used and loaded in the Great Wars, considering what the saddle was meant to do and the impact on the horse and rider.
The 1902 Universal Pattern (UP) saddle was an evolution and development of the military saddles from the previous century and also picking up feed back & learned lessons from the Boer War. 1890 had seen the introduction of the first Steel Arched military saddle – the 1890 UP, this provided stronger saddle trees (the base frame of a saddle). The front and back arch attach to wooden boards known as “fans” that are shaped to ensure that they don’t dig into the horse and also with the arches they ensure that the saddle load is not on the horse’s spine but transferred on the side of the horse, where the load can be better taken.
The Boer War had a horrendous effect on horses and mules used by the British Army. More troops were mounted during the campaign but the attrition on equines was significant, for a multitude of reasons, with massive lessons having to be learned and implemented. Two of the factors that was noted was the change in the role of the cavalry and the fact that troops were having to spend longer in the saddle and away from the support of their supply lines.

Canadian Mounted Rifles during the Boer War
Looking at the first of these factors, the Cavalry were no longer all about “Shock of Impact” Cavalry Charges, They provided the mobility on the battlefield and the ability to Recce, Patrol, Reinforce and to move quickly to protect flanks. They still retained the ability to charge home an attack but the view was that modern warfare would need to combine all of these elements to work. This meant that the Cavalryman of the 1900s would need to be a combination of Cavalryman and mounted infantryman. This would now mean that the Mounted Soldier would need the kit and equipment to carry out these roles.
The second factor was that while the horse allowed for mobility, the war in South Africa showed that the Cavalry and Mounted Infantryman would often be required to spend a longer period of time away from the main force and the logistic support that existed there for them. It was found that foraging and living off the land was no longer viable. As such it was recognised that a soldier and his horse would need to be self sustaining in the field for periods of between 24-48 hours.

Scottish Horse in South Africa 1900
To meet this new role requirement there would be a significant change in the load of the man and horse. This would mean that the equipment and weapons needed by the modern mounted soldier would have to be considered and what needed to be placed on the man and what was needed on the horse.
While the 1902 UP Saddle picked up on the lessons of the 1890 saddle and also incorporated some of the feedback from the Boer war, it was introduced after the end of the Boer War but it would continue to be developed over the next few years into an equipment system that would be ready for the next major conflict – the Great War.
So lets start by looking at the basic set up for the Saddle for what would be a mounted soldier with the Cavalry Division of the Great War. The saddle is fairly basic in construction and is deliberately designed for the comfort of the horse in the first place and to allow the rider to stay in the saddle for longer distances and times – it is a good endurance saddle and it is no coincidence that modern endurance and distance saddles take inspiration from the humble UP. The fans (the wooden boards on the side) have a set of felt pad covers that provide padding against the side of the horse. Under the saddle is normally a Brown blanket which modern riders think fills the role of a numnah to protect the back of the horse, however this is not the case. The UP Saddle was designed that it could be used without the blanket. The Blanket was actually there to be used as a night blanket for the horse – in the same way as horse rugs are used today. At night the blanket would be held in place with the Saddle’s surcingle strap.
In the field a second blanket would be added under the saddle, this wasn’t to add comfort or padding, this was the blanket for the rider, so you had one for the horse and one for the rider. The general rule was that the bottom blanket was the riders blanket and the upper was the horses blanket. where only one blanket carried it was a chargeable offence for a soldier to be found using his horse’s blanket!
The saddle would be secured to the horse using a short leather girth strap and for extra security the surcingle would go over the saddle and the girth strap. (this also meant that the surcingle had a duel role and would be carried without taking up space in a pouch or wallet.)
The UP Bridle or Headset was also a multi functional bit of kit. It was formed of 3 parts.
The basic part formed a head collar that would stay on the horse at all times.
The second part would be the strap that has the Port Mouth Reverse (PMR) Bit, and this could be easily removed and fitted and was held in place by putting the bit in the horses mouth, lifting the strap over the ears of the horse and then securing the strap at the side of the head collar behind two leather tabs and a brass stud.
The third part was the 2 sets of leather reins, this gave good control and contact with the horse, and military riders were taught to ride one handed (generally with the left hand) the principle rein was the top rein. (The horse could be ridden with one rein should a rein be damaged or snap).
Clear image of the UP Head Set – However the bit strap should lie flat over the buckle.
The Head set had 2 important accessories which were vital for riding in the field.
- The first of these is the Lead/ Head rope. This was a 10′ rope with either a metal ring at one end (this type was a troopers rope) or one with a leather buckle (Officers rope). This would be fixed to the Bridle at the Jowl piece and then looped over the horses neck and tied off with a hangmans noose. The rope would be used to lead the horse when the bit and reins were removed. it also allowed the horse to be secured to a picket line/ rope. The 10′ length would allow the horse to be fixed to a high or low picket line, eat in its allotted area and also lie down to rest or sleep.
- The second item is an item that would be occasionally used, that of the Fly Fringe. this was a length of leather with platted ropes attached that would hang down over the horses eyes. this would attach to the Bridle by looping tabs around the bridle leather and then closing onto brass studs. Fly fringes while very common in the Middle East Campaigns they were regularly seen in the summers on the Western Front.

A Yeomanry Trooper and horse in Egypt, UP Bridle fitted with Fly Fringe
The UP saddle has a number of slots, loops and rings positioned around the saddle. These would allow for additional items of equipment to be attached to the Saddle, but it is not the case that you could add kit and equipment as you see fit, it had to be placed to ensure balance on the saddle and the horse. I’ll now take a look at each item and where it would be placed on the saddle.
Starting at the front we would have the saddle wallets, these had been a feature of the UP saddles for years, possibly evolving from the pistol holsters of the past. The wallets sat over the front arch with it secured to the arch using 2 special double buckle straps (Later pattern straps would be of a Y pattern). The wallets would have one pouch on each side of the saddle. One pouch would hold grooming kit for the horse and the second pouch would hold personal kit for the rider, such as socks, underpants, personal kit roll and housewife kit.
On top of the wallets would be strapped the rain cape. This would held under the Wallet straps but would not be secured on the centre of the wallets, as the rain cape could be pulled out from the straps by the rider and put on over the shoulders while still on horse back.

Rain Cape strapped to Wallets – Surcingle can be seen over the saddle seat
If the rider was not issued with saddle wallets then the Greatcoat was rolled to roughly to 27″ and secured with 3 baggage straps. This would then be placed on the front of the saddle and secured to the front arch using the same baggage straps.

RE Driver with rolled Greatcoat on the front of the saddle.
If the rider did have the wallets then the greatcoat would be fitted to the rear of the saddle, ensuring that it was strapped below the rear cantel. by keeping the rolled great coat below the cantel then it will not interfere with rider when he mounts the horse. If it is above the cantel then the rider may struggle to get his leg over the rear of the saddle. (I’ve made that mistake in the past).
Greatcoat fixed at the rear of the saddle
The next item that is on the saddle is the Shoe case, For the UP Saddle there are 2 types of shoe case, one with loops fitted for attaching a sword and one that is plain. In both versions the case folds open and holds 2 horseshoes – one front and one rear, sized for the horse. The plain version shoe case would be used for the non cavalry units such as Sappers and Gunners.
Shoe case with loops and strap for Cavalry sword
On the other side of the saddle would be fitted the Rifle bucket to take the SMLE Rifle. One of the principle lessons from the Boer war was that all units types should be using the same type of weapon rather than mounted units using carbines. The rifle bucket hangs from the rear arch of the saddle and has a steadying strap that is looped onto the Surcingle to stop it bouncing when you ride.
Rifle bucket fixed to rear Arch and secured to the surcingle.
Turning now to the additional item that could be loaded or fitted to the saddle:
- Picket Line rope – This is a 5′ length of rope with a loop or metal ring at one end and a wooden toggle at the other. When away from the horse lines it is possible to create a horse line using these ropes by linking them together. The 10′ length was sufficient to allow each horse space to move and lie down without getting in the way of the last horse. Picket lines could be place at ground level or at waist height. The horse would be secured to the picket line using the head rope. When not in uses the picket line rope would be carried around the horse’s neck.
- Picket Peg – Each horse would carry a picket peg, often made from Ash and with metal added to the point of the peg to protect it when being driven into the ground. The top of the peg would have a metal band added to prevent the wood from splitting during hammering. The peg would also have a rope loop added, going through the peg itself, this was to tie the Picket line rope or the lead rope to. When not in use the peg would be secured to the Sword Scabbard with a picket peg strap that was suspended from the back of the horse shoe case. The rope loop of the peg would also be looped over the top of the shoe case to help retain it should the straps work loose.
Image shows picket line around neck, double blankets and folded bucket, nosebag and picket peg strapped to the shoecase and sword scabbard
- Nose Bag – The easiest way to allow horses to eat hard feed (corn, oat etc) was by providing a canvas bag, with a long canvas handle that went over the head of the horse. When the nose bag was empty then it was folded around the picket peg and secured using the picket peg straps. when it was full then it was secured to the back arch of the saddle, on the near side, so that it rested on the wooden fans of the saddle.
- Small Corn Sack. This would carry the hard feed for the horse such as corn, oats etc. If you consider the Nose bag holding the feed for the next meal for the horse, the corn sack carried the spare rations. Also the rations carried in the corn sack should be dry. any wetting of feed should be done after the rations have been decanted out of the corn sack. When the corn sack is empty it would be strapped between the Greatcoat and the cantel at the rear of the saddle, when full it would be tied to the rear of the saddle using the loops on the rear arch of the saddle.
Filled Nose bag and Small corn sacks on either side of the saddles.
- Forage net. For longer patrols or marches each horse would carry a hay/ forage net filled. This is seen on quite a lot of images taken towards the end of the war where there was far more mobility and the cavalry were moving regularly and the echelon were always playing catch up. When not filled the hay net stayed with the horse but was folded and strapped at the rear of the saddle between the greatcoat and the cantel. When the horse was secured to a picket line or in horse lines then the rider would take the hay net and fill it and then tie the net to the picket line in-front of the horse. On the move filled hay nets seem to be positioned in a number of locations, Major Waite’s book “A few useful notes on Horsemanship” (1912) states that the full hay net should be carried at the front of the saddle infront of the wallets, but I have more regularly seen them secured at the rear of the saddle. My own view is that this probably depended on the unit, the rider and the horse, in my own case I wouldn’t have the hay net at the front as my horse – Rosey – has a fairly bendy neck and would probably be able to eat the hay while on the move!
A fully kitted out horse with a full haynet at the rear of the saddle
- Cavalry Mess Tin – The cavalry mess tine is quite distinct from the infantry D-shaped tins by being a 2 part round tin, a round pan with handle and a shallow lid. these were held together with a leather strap with a buckle. As a general rule the mess tin would be strapped to the top section of the Rifle buckle but I have seen then strapped to the rear of the saddle and in non cavalry units I have seen photos of them strapped to the shoe case. When the Soldiers operated in the dismounted role, such as when they were in the trenches the mess tin would be secured to the Waterbottle, by treading the leather strap through the leather straps of the waterbottle cradle.
- Heel rope and picket peg – not every horse would have a heel rope, Often these would be issued at a ratio of 1:8, but more often they were issued where a horse was known kick when on the horse lines or where the horse would swing it’s backside into the areas of its neighbouring horse. where it was issued to the rider the peg would be carried next to the normal picket peg and the strap and rope would be coiled up and secured on the near side at the rear of the saddle using a leather baggage strap.
- 90 round bandolier – Not every mounted soldier would have an extra 90 round ammunition bandolier, this was mainly focused on Cavalry personnel and Mounted Infantry. If they were issued then these would be slung around the neck of the horse. When the soldier dismounted he would go forward with his 90 rounds on his bandolier and the 10 rounds in his SMLE, the horses would then be moved back to a safe area and looked after by a horse holder, if more ammunition was required the the idea was that the bandoliers would be collected from from the horses and brought forward to where the men were fighting. While the bandolier is just slung around the neck of the horse it will have a tendency toslip or slide on the horse’s neck and often it would be secured back to the saddle using a small bit of string or a short baggage strap.
- Hoof Pick – This an essential piece of horse care equipment and would be used at multiple times during the day, to clear any mud, dirt, stones and anything that would potentially get stuck in the horse’s hoof. Major Waites handbook states that the hoof pick would “slung on a strap” at the on the outside of the shoe case. I suppose it would depend on the type and shape of the hoof pick. Some soldiers were issued with folding hoof picks while some had the ones made from a single piece of bent metal. For some soldiers they would attached the hoof pick to the same lanyard as the clasp knife, which would be around the waist of the soldier. Alternatively it could be fitted to the end of the shoulder lanyard with the pick and the long end of the lanyard being kept in the top pocket of the jacket – this is the choice that I use when kitted out as a mounted soldier.
- Canvas Water Bucket – This was a stitched canvas bucket with a rope handle and would be used to provide water for the horse when on a picket line or when at a halt but not allowed to drink from the source such as a river or pond. When not being used the bucket would be pressed flat and could be secured on the saddle in a couple of locations. For Sappers it appears that they were required to have the rope handle loop over the top and back of the rifle bucket and to hang from there. For some units it would be pushed flat and wrapped around the picket pegs secured by the picket peg strap and the rope handle would be looped behind the sword scabbard.

waterbucket and cavalry mess tin attached to the rifle bucket.
You can see that there is a lot of kit and equipment that gets carried on the horse when it is “operational”. The positioning of all these items is very carefully done and worked out so that the load is as balanced and even on the horse as possible. Where possible the load would be kept to a minimum and the loads would only be added when absolutely necessary.
Having ridden distance events with a “full” saddle I have a few observations. The saddle is still comfortable to ride in and the weight is very balanced. Once you are in the saddle, you feel very secure in it, almost as if you are built into it, and it works at the walk, trot and canter. But – there is a knack to kitting your saddle out and you must make sure all the straps are in good order and fully done up, otherwise you will end up scattering kit all over the parish.
There is lot in this post and hopefully it has given an insight to some of the kit and variations that can be seen in the photos of the period. The Metal Arch UP saddles (1890,1902 and 1912) were designed to allow different configurations of load and combined with the UP Head Set/ Bridle you have a brilliant system of Horse equipment that will allow the horse and rider to sustain and operate in the field and allow variations of configurations to suit the task and role of the rider and the unit.
References:
Maj AW Waite 10th Royal Hussars, A few useful notes on Horsemanship, Stable Management, Saddling etc, 1912
Lt Col DC Howell-Price, The Light Horse Pocket Book ,1914
General Staff War Office, Cavalry Training, 1907
General Staff War Office, Cavalry Training, 1915
General Staff War Office, Manual of Horsemanship, Equitation and Animal Transport, 1937
Veterinary Department for the General Staff, Notes on Horse Management in the Field, 1919
General Staff War Office, Yeomanry and Mounted Rifle Training Parts 1 &2, 1912
General Staff War Office, Artillery Training Volume 1 (Drill), 1924
General Staff War Office, Engineer Training Volume 1 (Drill), 1929