
If you horse ride the chances are that you would have ridden a General Purpose (GP) saddle, these are designed to cover most types of activities that a modern rider would possibly participate in. These saddles tend to be comfortable, robust and ideal for the Manege and a hack out, that comfort is for both the rider and the horse. When modern riders look at the basic nature of the military saddle their first reaction is “bloody hell! that looks uncomfortable!” but that is anything but the case. I’ll now take a look at the UP Saddle and the way it would have been used and loaded in the Great Wars, considering what the saddle was meant to do and the impact on the horse and rider.
The 1902 Universal Pattern (UP) saddle was an evolution and development of the military saddles from the previous century and also picking up feed back & learned lessons from the Boer War. 1890 had seen the introduction of the first Steel Arched military saddle – the 1890 UP, this provided stronger saddle trees (the base frame of a saddle). The front and back arch attach to wooden boards known as “fans” that are shaped to ensure that they don’t dig into the horse and also with the arches they ensure that the saddle load is not on the horse’s spine but transferred on the side of the horse, where the load can be better taken.
The Boer War had a horrendous effect on horses and mules used by the British Army. More troops were mounted during the campaign but the attrition on equines was significant, for a multitude of reasons, with massive lessons having to be learned and implemented. Two of the factors that was noted was the change in the role of the cavalry and the fact that troops were having to spend longer in the saddle and away from the support of their supply lines.
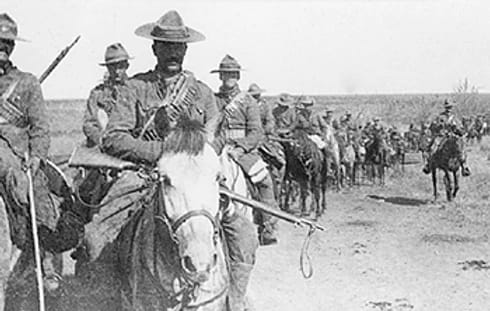
Canadian Mounted Rifles during the Boer War
Looking at the first of these factors, the Cavalry were no longer all about “Shock of Impact” Cavalry Charges, They provided the mobility on the battlefield and the ability to Recce, Patrol, Reinforce and to move quickly to protect flanks. They still retained the ability to charge home an attack but the view was that modern warfare would need to combine all of these elements to work. This meant that the Cavalryman of the 1900s would need to be a combination of Cavalryman and mounted infantryman. This would now mean that the Mounted Soldier would need the kit and equipment to carry out these roles.
The second factor was that while the horse allowed for mobility, the war in South Africa showed that the Cavalry and Mounted Infantryman would often be required to spend a longer period of time away from the main force and the logistic support that existed there for them. It was found that foraging and living off the land was no longer viable. As such it was recognised that a soldier and his horse would need to be self sustaining in the field for periods of between 24-48 hours.
Scottish Horse in South Africa 1900
To meet this new role requirement there would be a significant change in the load of the man and horse. This would mean that the equipment and weapons needed by the modern mounted soldier would have to be considered and what needed to be placed on the man and what was needed on the horse.
While the 1902 UP Saddle picked up on the lessons of the 1890 saddle and also incorporated some of the feedback from the Boer war, it was introduced after the end of the Boer War but it would continue to be developed over the next few years into an equipment system that would be ready for the next major conflict – the Great War.
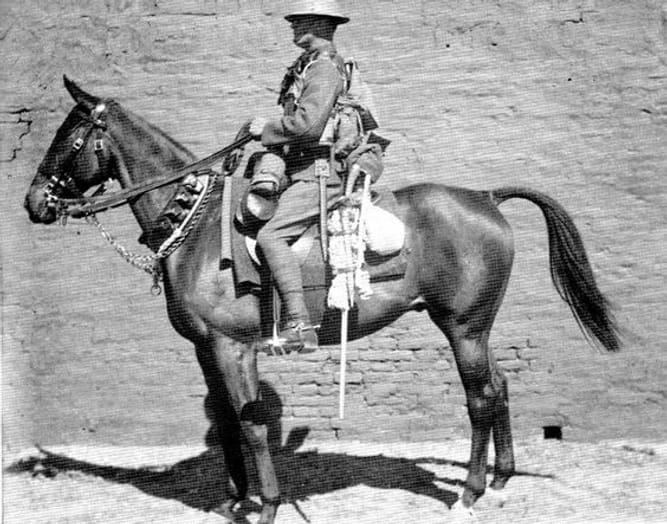
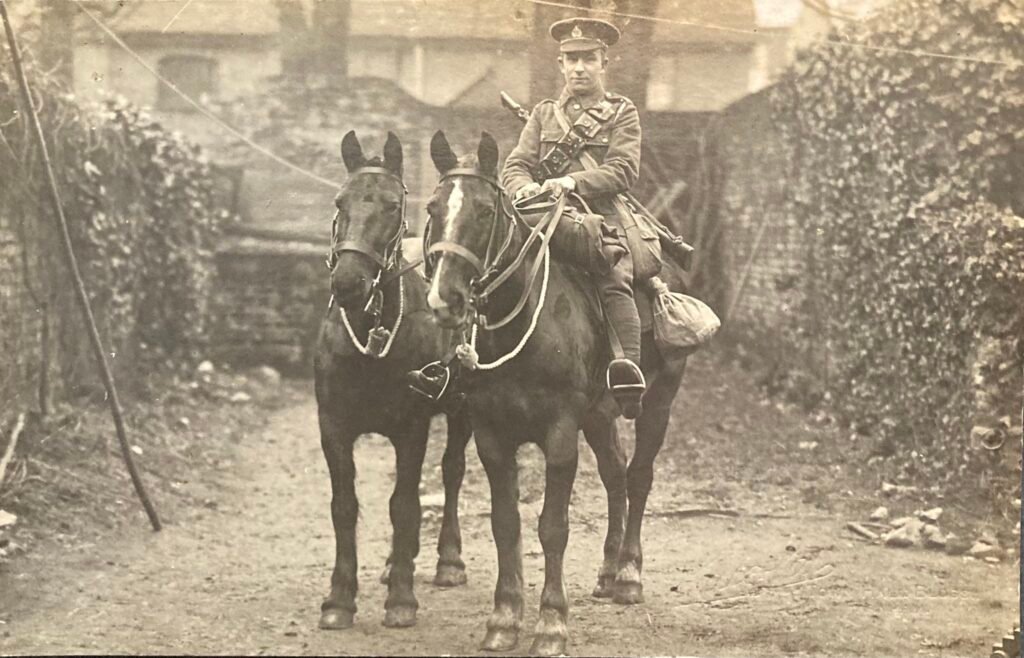
So lets start by looking at the basic set up for the Saddle for what would be a mounted soldier with the Cavalry Division of the Great War. The saddle is fairly basic in construction and is deliberately designed for the comfort of the horse in the first place and to allow the rider to stay in the saddle for longer distances and times – it is a good endurance saddle and it is no coincidence that modern endurance and distance saddles take inspiration from the humble UP. The fans (the wooden boards on the side) have a set of felt pad covers that provide padding against the side of the horse. Under the saddle is normally a Brown blanket which modern riders think fills the role of a numnah to protect the back of the horse, however this is not the case. The UP Saddle was designed that it could be used without the blanket. The Blanket was actually there to be used as a night blanket for the horse – in the same way as horse rugs are used today. At night the blanket would be held in place with the Saddle’s surcingle strap.
In the field a second blanket would be added under the saddle, this wasn’t to add comfort or padding, this was the blanket for the rider, so you had one for the horse and one for the rider. The general rule was that the bottom blanket was the riders blanket and the upper was the horses blanket. where only one blanket carried it was a chargeable offence for a soldier to be found using his horse’s blanket!
The saddle would be secured to the horse using a short leather girth strap and for extra security the surcingle would go over the saddle and the girth strap. (this also meant that the surcingle had a duel role and would be carried without taking up space in a pouch or wallet.)
The UP Bridle or Headset was also a multi functional bit of kit. It was formed of 3 parts.
The basic part formed a head collar that would stay on the horse at all times.
The second part would be the strap that has the Port Mouth Reverse (PMR) Bit, and this could be easily removed and fitted and was held in place by putting the bit in the horses mouth, lifting the strap over the ears of the horse and then securing the strap at the side of the head collar behind two leather tabs and a brass stud.
The third part was the 2 sets of leather reins, this gave good control and contact with the horse, and military riders were taught to ride one handed (generally with the left hand) the principle rein was the top rein. (The horse could be ridden with one rein should a rein be damaged or snap).

Clear image of the UP Head Set – However the bit strap should lie flat over the buckle.
The Head set had 2 important accessories which were vital for riding in the field.
- The first of these is the Lead/ Head rope. This was a 10′ rope with either a metal ring at one end (this type was a troopers rope) or one with a leather buckle (Officers rope). This would be fixed to the Bridle at the Jowl piece and then looped over the horses neck and tied off with a hangmans noose. The rope would be used to lead the horse when the bit and reins were removed. it also allowed the horse to be secured to a picket line/ rope. The 10′ length would allow the horse to be fixed to a high or low picket line, eat in its allotted area and also lie down to rest or sleep.
- The second item is an item that would be occasionally used, that of the Fly Fringe. this was a length of leather with platted ropes attached that would hang down over the horses eyes. this would attach to the Bridle by looping tabs around the bridle leather and then closing onto brass studs. Fly fringes while very common in the Middle East Campaigns they were regularly seen in the summers on the Western Front.

A Yeomanry Trooper and horse in Egypt, UP Bridle fitted with Fly Fringe
The UP saddle has a number of slots, loops and rings positioned around the saddle. These would allow for additional items of equipment to be attached to the Saddle, but it is not the case that you could add kit and equipment as you see fit, it had to be placed to ensure balance on the saddle and the horse. I’ll now take a look at each item and where it would be placed on the saddle.
Starting at the front we would have the saddle wallets, these had been a feature of the UP saddles for years, possibly evolving from the pistol holsters of the past. The wallets sat over the front arch with it secured to the arch using 2 special double buckle straps (Later pattern straps would be of a Y pattern). The wallets would have one pouch on each side of the saddle. One pouch would hold grooming kit for the horse and the second pouch would hold personal kit for the rider, such as socks, underpants, personal kit roll and housewife kit.
On top of the wallets would be strapped the rain cape. This would held under the Wallet straps but would not be secured on the centre of the wallets, as the rain cape could be pulled out from the straps by the rider and put on over the shoulders while still on horse back.
Rain Cape strapped to Wallets – Surcingle can be seen over the saddle seat
If the rider was not issued with saddle wallets then the Greatcoat was rolled to roughly to 27″ and secured with 3 baggage straps. This would then be placed on the front of the saddle and secured to the front arch using the same baggage straps.
RE Driver with rolled Greatcoat on the front of the saddle.
If the rider did have the wallets then the greatcoat would be fitted to the rear of the saddle, ensuring that it was strapped below the rear cantel. by keeping the rolled great coat below the cantel then it will not interfere with rider when he mounts the horse. If it is above the cantel then the rider may struggle to get his leg over the rear of the saddle. (I’ve made that mistake in the past).

Greatcoat fixed at the rear of the saddle
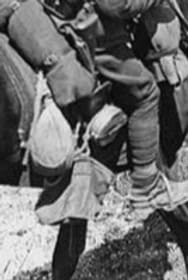
The next item that is on the saddle is the Shoe case, For the UP Saddle there are 2 types of shoe case, one with loops fitted for attaching a sword and one that is plain. In both versions the case folds open and holds 2 horseshoes – one front and one rear, sized for the horse. The plain version shoe case would be used for the non cavalry units such as Sappers and Gunners.

Shoe case with loops and strap for Cavalry sword
On the other side of the saddle would be fitted the Rifle bucket to take the SMLE Rifle. One of the principle lessons from the Boer war was that all units types should be using the same type of weapon rather than mounted units using carbines. The rifle bucket hangs from the rear arch of the saddle and has a steadying strap that is looped onto the Surcingle to stop it bouncing when you ride.

Rifle bucket fixed to rear Arch and secured to the surcingle.
Turning now to the additional item that could be loaded or fitted to the saddle:
- Picket Line rope – This is a 5′ length of rope with a loop or metal ring at one end and a wooden toggle at the other. When away from the horse lines it is possible to create a horse line using these ropes by linking them together. The 10′ length was sufficient to allow each horse space to move and lie down without getting in the way of the last horse. Picket lines could be place at ground level or at waist height. The horse would be secured to the picket line using the head rope. When not in uses the picket line rope would be carried around the horse’s neck.
- Picket Peg – Each horse would carry a picket peg, often made from Ash and with metal added to the point of the peg to protect it when being driven into the ground. The top of the peg would have a metal band added to prevent the wood from splitting during hammering. The peg would also have a rope loop added, going through the peg itself, this was to tie the Picket line rope or the lead rope to. When not in use the peg would be secured to the Sword Scabbard with a picket peg strap that was suspended from the back of the horse shoe case. The rope loop of the peg would also be looped over the top of the shoe case to help retain it should the straps work loose.

Image shows picket line around neck, double blankets and folded bucket, nosebag and picket peg strapped to the shoecase and sword scabbard
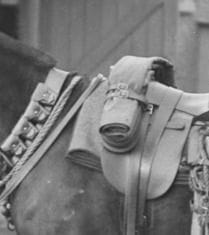
- Nose Bag – The easiest way to allow horses to eat hard feed (corn, oat etc) was by providing a canvas bag, with a long canvas handle that went over the head of the horse. When the nose bag was empty then it was folded around the picket peg and secured using the picket peg straps. when it was full then it was secured to the back arch of the saddle, on the near side, so that it rested on the wooden fans of the saddle.
- Small Corn Sack. This would carry the hard feed for the horse such as corn, oats etc. If you consider the Nose bag holding the feed for the next meal for the horse, the corn sack carried the spare rations. Also the rations carried in the corn sack should be dry. any wetting of feed should be done after the rations have been decanted out of the corn sack. When the corn sack is empty it would be strapped between the Greatcoat and the cantel at the rear of the saddle, when full it would be tied to the rear of the saddle using the loops on the rear arch of the saddle.

Filled Nose bag and Small corn sacks on either side of the saddles.
- Forage net. For longer patrols or marches each horse would carry a hay/ forage net filled. This is seen on quite a lot of images taken towards the end of the war where there was far more mobility and the cavalry were moving regularly and the echelon were always playing catch up. When not filled the hay net stayed with the horse but was folded and strapped at the rear of the saddle between the greatcoat and the cantel. When the horse was secured to a picket line or in horse lines then the rider would take the hay net and fill it and then tie the net to the picket line in-front of the horse. On the move filled hay nets seem to be positioned in a number of locations, Major Waite’s book “A few useful notes on Horsemanship” (1912) states that the full hay net should be carried at the front of the saddle infront of the wallets, but I have more regularly seen them secured at the rear of the saddle. My own view is that this probably depended on the unit, the rider and the horse, in my own case I wouldn’t have the hay net at the front as my horse – Rosey – has a fairly bendy neck and would probably be able to eat the hay while on the move!

A fully kitted out horse with a full haynet at the rear of the saddle
- Cavalry Mess Tin – The cavalry mess tine is quite distinct from the infantry D-shaped tins by being a 2 part round tin, a round pan with handle and a shallow lid. these were held together with a leather strap with a buckle. As a general rule the mess tin would be strapped to the top section of the Rifle buckle but I have seen then strapped to the rear of the saddle and in non cavalry units I have seen photos of them strapped to the shoe case. When the Soldiers operated in the dismounted role, such as when they were in the trenches the mess tin would be secured to the Waterbottle, by treading the leather strap through the leather straps of the waterbottle cradle.
- Heel rope and picket peg – not every horse would have a heel rope, Often these would be issued at a ratio of 1:8, but more often they were issued where a horse was known kick when on the horse lines or where the horse would swing it’s backside into the areas of its neighbouring horse. where it was issued to the rider the peg would be carried next to the normal picket peg and the strap and rope would be coiled up and secured on the near side at the rear of the saddle using a leather baggage strap.
- 90 round bandolier – Not every mounted soldier would have an extra 90 round ammunition bandolier, this was mainly focused on Cavalry personnel and Mounted Infantry. If they were issued then these would be slung around the neck of the horse. When the soldier dismounted he would go forward with his 90 rounds on his bandolier and the 10 rounds in his SMLE, the horses would then be moved back to a safe area and looked after by a horse holder, if more ammunition was required the the idea was that the bandoliers would be collected from from the horses and brought forward to where the men were fighting. While the bandolier is just slung around the neck of the horse it will have a tendency toslip or slide on the horse’s neck and often it would be secured back to the saddle using a small bit of string or a short baggage strap.
- Hoof Pick – This an essential piece of horse care equipment and would be used at multiple times during the day, to clear any mud, dirt, stones and anything that would potentially get stuck in the horse’s hoof. Major Waites handbook states that the hoof pick would “slung on a strap” at the on the outside of the shoe case. I suppose it would depend on the type and shape of the hoof pick. Some soldiers were issued with folding hoof picks while some had the ones made from a single piece of bent metal. For some soldiers they would attached the hoof pick to the same lanyard as the clasp knife, which would be around the waist of the soldier. Alternatively it could be fitted to the end of the shoulder lanyard with the pick and the long end of the lanyard being kept in the top pocket of the jacket – this is the choice that I use when kitted out as a mounted soldier.
- Canvas Water Bucket – This was a stitched canvas bucket with a rope handle and would be used to provide water for the horse when on a picket line or when at a halt but not allowed to drink from the source such as a river or pond. When not being used the bucket would be pressed flat and could be secured on the saddle in a couple of locations. For Sappers it appears that they were required to have the rope handle loop over the top and back of the rifle bucket and to hang from there. For some units it would be pushed flat and wrapped around the picket pegs secured by the picket peg strap and the rope handle would be looped behind the sword scabbard.

waterbucket and cavalry mess tin attached to the rifle bucket.
You can see that there is a lot of kit and equipment that gets carried on the horse when it is “operational”. The positioning of all these items is very carefully done and worked out so that the load is as balanced and even on the horse as possible. Where possible the load would be kept to a minimum and the loads would only be added when absolutely necessary.
Having ridden distance events with a “full” saddle I have a few observations. The saddle is still comfortable to ride in and the weight is very balanced. Once you are in the saddle, you feel very secure in it, almost as if you are built into it, and it works at the walk, trot and canter. But – there is a knack to kitting your saddle out and you must make sure all the straps are in good order and fully done up, otherwise you will end up scattering kit all over the parish.
There is lot in this post and hopefully it has given an insight to some of the kit and variations that can be seen in the photos of the period. The Metal Arch UP saddles (1890,1902 and 1912) were designed to allow different configurations of load and combined with the UP Head Set/ Bridle you have a brilliant system of Horse equipment that will allow the horse and rider to sustain and operate in the field and allow variations of configurations to suit the task and role of the rider and the unit.
References:
Maj AW Waite 10th Royal Hussars, A few useful notes on Horsemanship, Stable Management, Saddling etc, 1912
Lt Col DC Howell-Price, The Light Horse Pocket Book ,1914
General Staff War Office, Cavalry Training, 1907
General Staff War Office, Cavalry Training, 1915
General Staff War Office, Manual of Horsemanship, Equitation and Animal Transport, 1937
Veterinary Department for the General Staff, Notes on Horse Management in the Field, 1919
General Staff War Office, Yeomanry and Mounted Rifle Training Parts 1 &2, 1912
General Staff War Office, Artillery Training Volume 1 (Drill), 1924
General Staff War Office, Engineer Training Volume 1 (Drill), 1929