Fixing the Comms and getting back to the research
The last few months have been absolute bedlam for me. I have had difficulty to try and spare time for doing some of the History research, Unfortunately it wasn’t the farm work that was creating the problem.
However there has been some changes, not planned admittedly, but it does mean that I can now free some capacity and some time for doing what I enjoy.
Having now had some time I have finally manged to get back to the Website and the linked email and found that for the last month there has been a problem, particularly with the Emails,

I’ve finally managed to get back into the emails and get them updated, cleared the junk and spam. Hopefully that now has me back to having a clear set of Comms.
The Holt tractor post is becoming more complicated with lots of twists and turns and a need for lots of cross referencing and checking – the reason being is that there is some very dubious information that has been posted to blur the history, which in itself is really interesting to follow and work through but it takes time, and takes you down a few rabbit holes which are important to follow through.
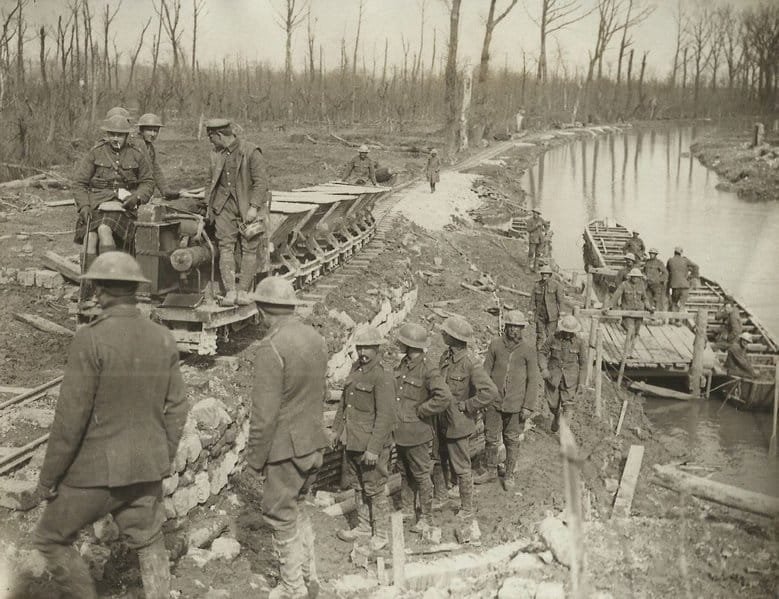
I’ve also go a Royal Engineers History Society Webinar talk at the start of July on Sappers and Cavalry Gap Crossing in 1916, so that is the focus.

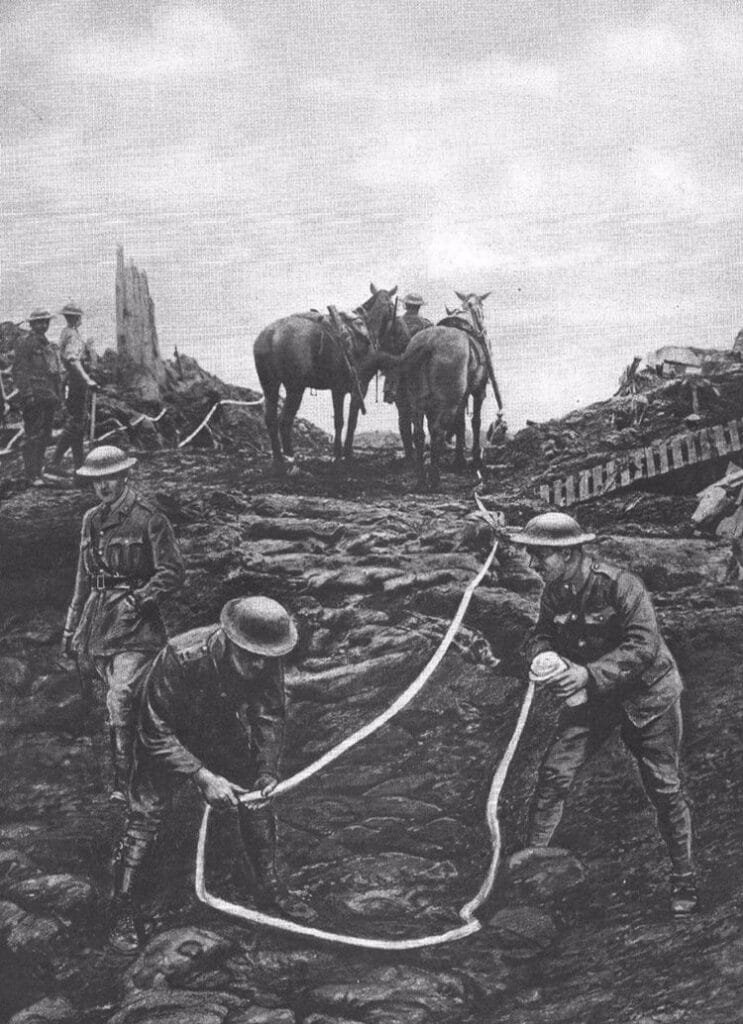
Marking a Cavalry Lane across the battlefield. I’ve also realised that I need to get back involved in Living History Events, particularly Great War, as that is something that I realise that I have been missing. Hopefully I can get into things particularly as I want to work on a few more impressions.

Well best bash on…
Man of Hartshorne – The Gallipoli MiD
The 25th of April is often seen simply as ANZAC Day, well it is known and celebtrated as ANZAC day, a day based of the action of the landings by Australian and New Zealand troop on the Gallipoli beaches in 1915.
What is often over-looked, forgotten and in some cases ignored that those landing included British, Indian and French troops as well, of which the largest contingent of all the contributing nations was that of Britain.
I’m not for decry the Australians and the New Zealanders their day, but we in Britain need to recognise the efforts and sacrifice of the British personnel that took part in the landings on the 25th April 1915 as well as the whole of the Gallipoli campaign.
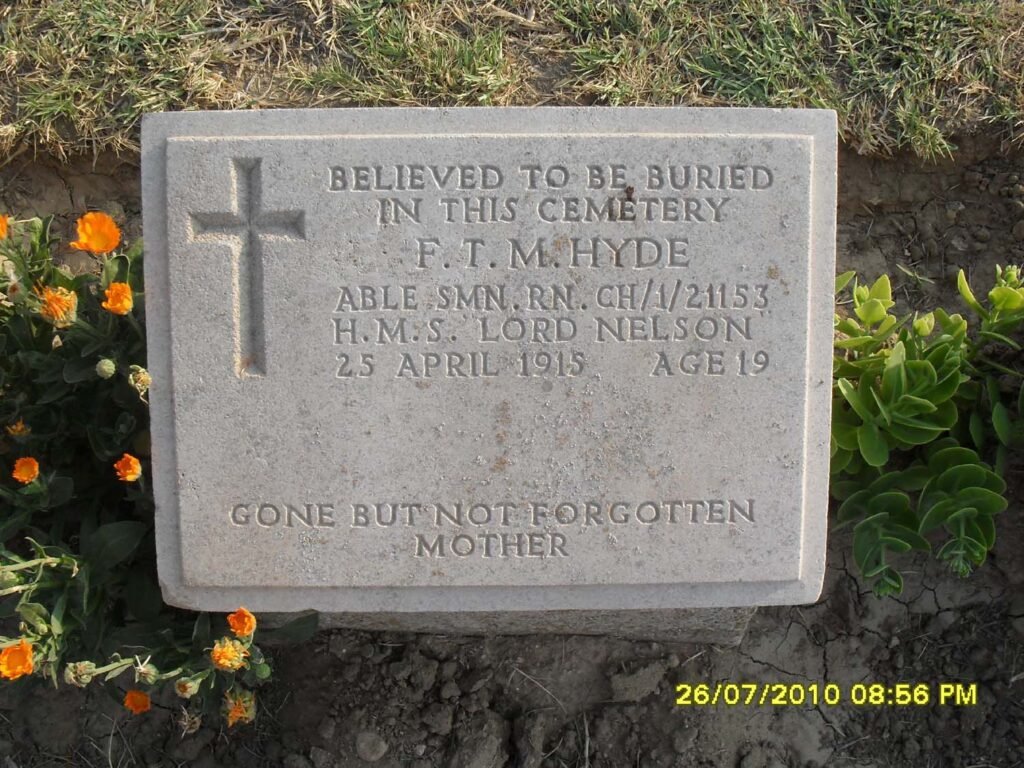
One of those that fell on the 25th April 1915 is a 19 year old Royal Navy Able Seaman who is named on the Hartshorne War Memorial – Frederick Hyde.
Fred Hyde was part of the compliment on HMS Lord Nelson and had been involved in the earlier efforts by the Navy to force the Dardanelles straights. The difficulties and the failure to clear and force the straights meant that land forces had to be committed so that the peninsula could be secured and the coastal guns and the hidden howitzers, that had troubled the navy so much could cleared.
The only way to do this was to land troops onto a number of very small and limited beaches. Such a size and scale of Amphibious operation had not been done before and given that the planning for this was done in a period of 5 weeks meant that landings would be done using what was at hand. With the best luck this was going to be a very difficult task.

Landings would take place at a number of beaches and they were given the following designations – French Beach (for the French troops and on the east side of the Dardanelles), S Beach, V Beach, W Beach, X Beach, Y Beach and further to the North Z Beach which became known as ANZAC Cove.
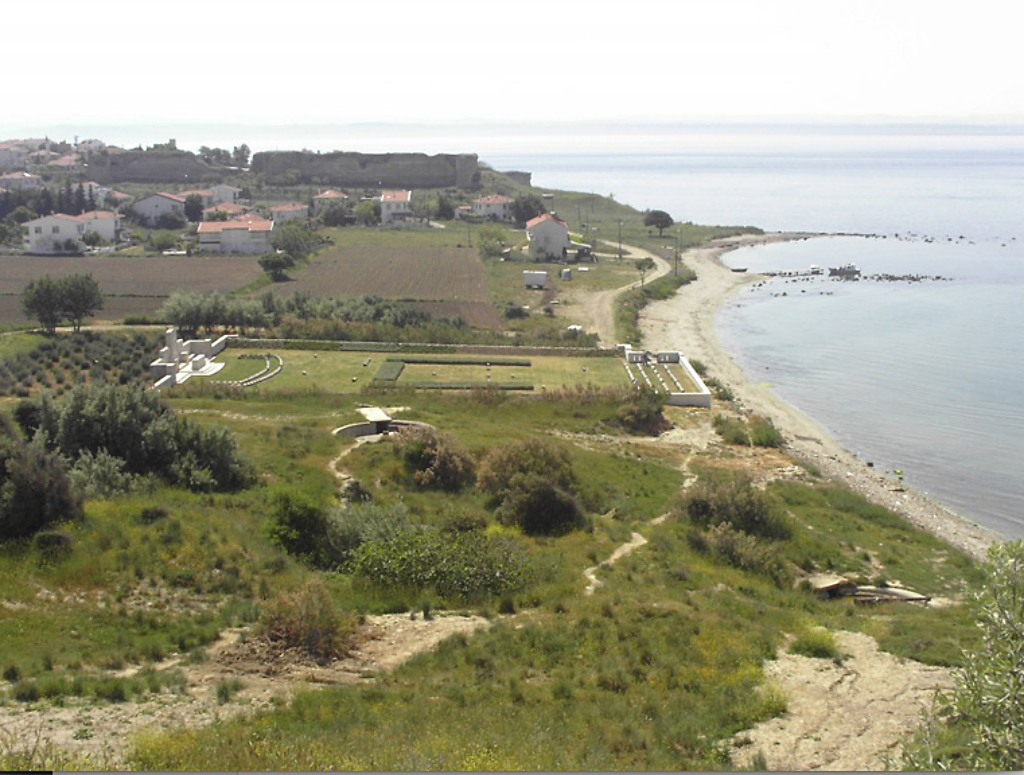
I’m going to focus on V Beach as this is the one that involved Able Seaman Fred Hyde. The beach is quite limited in depth and isn’t particularly wide but it is overlooked by a number of low lying ridges and also the the old fort and coastal defences at Sedd-el-Bar.
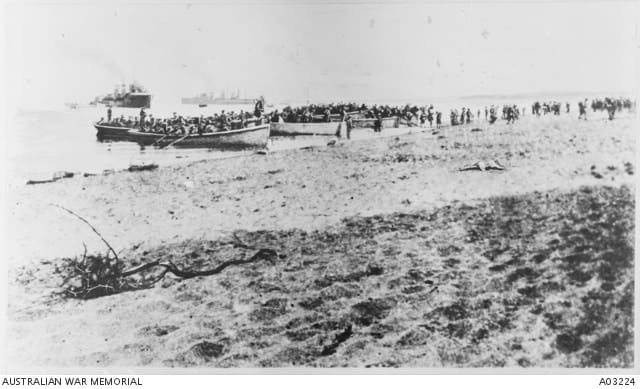
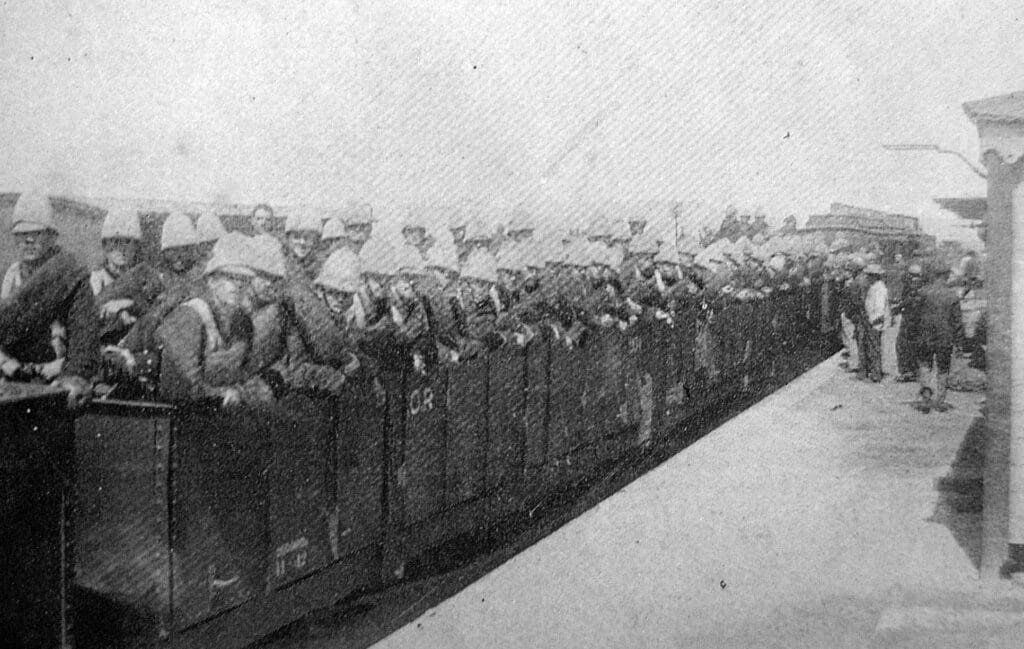
The plan was to land the Dublin Fusiliers battalion using Ships boats, initially towed using steam tugs and a collier. these boats would be towed as close as possible and then they would row the last part to the shore. they could take about 20 soldiers and they would provide the rowers as well. The Royal Navy would provide sailors to man and operate the boats onto and off the beach. These men would come from across the fleet.

Troops practising landings at Lemnos a few days before the actual landings at Gallipoli. HMS Lord Nelson would provide 10 Able Seamen to man the boats of which Fred Hyde was one. The following is an extract taken from the Dispatch from Vice Admiral John de Robeck RN to the Secretary of the Admiralty and reported on the landings. This extract focuses on the details and defences at V Beach and with this information you can start to understand the fate of the Royal Navy men that crewed the boats in the initial landing, one of whom was Fred Hyde.
“V beach is situated immediately to the west of Sedd-el-Bar. Between the bluff on which stands Sedd-el-Bahr village and that which is crowned by No. 1 Fort the ground forms a very regular amphitheatre of three or four hundred yards radius. The slopes down to the beach are slightly concave, so that the whole area contained within the limits of this natural amphitheatre, whose grassy terraces rise gently to a height of a hundred feet above the shore, can be swept by the fire of a defender. The beach itself is a sandy strip some 10 yards wide and 350 yards long, backed along almost the whole of its extent by a low sandy escarpment about 4 feet high, where the ground falls nearly sheer down to the beach. The slight shelter afforded by this escarpment played no small part in the operations of the succeeding thirty-two hours.
At the south-eastern extremity of the beach, between the shore and the village, stands the old fort of Sedd-el-Bahr, a battered ruin with wide breaches in its walls and mounds of fallen masonry within and around it. On the ridge to the north, overlooking the amphitheatre, stands a ruined barrack. Both of these buildings, as well as No. 1 Fort, had been long bombarded by the fleet, and the guns of the forts had been put out of action; but their crumbled walls and the ruined outskirts of the village afforded cover for riflemen, while from the terraced slopes already described the defenders were able to command the open beach, as a stage is overlooked from the balconies of a theatre.
On the very margin of the beach a strong “barbed-wire entanglement, made of heavier metal and longer barbs than I have ever seen elsewhere, ran right across from the old fort of Sedd-el-Bahr to the foot of the northwestern headland. Two-thirds of the way up the ridge a second and even stronger entanglement crossed the amphitheatre, passing in front of the old barrack and ending in the outskirts of the village. A third transverse entanglement, joining these two, ran up the hill near the eastern end of the beach, and almost at right angles to it.“The full dispach can be read at the following link –
https://www.naval-history.net/WW1Battle1503Dardanelles2.htm#29264
The following is extracted from the Dispatch that General Ian Hamilton submitted and was published in the London Gazette in July 1915. This extract focuses on the actual landings of the small boats with the Dublin Fusiliers.
“Whilst the boats and the collier were approaching the landing place the Turks made no sign. Up to the very last moment it appeared as if the landing was to be unopposed. But the moment the first boat touched bottom the storm broke. A tornado of fire swept over the beach, the incoming boats, and the collier. The Dublin Fusiliers and the naval boats’ crews suffered exceedingly heavy losses while still in those boats. Those who succeeded in landing and in crossing the strip of sand managed to gain some cover when they reached the low escarpment on the further side. None of the boats, however, were able to get off again, and they and their crews were destroyed upon the beach”


V Beach today with the old fort in the distance, you can see how shallow the beach is and the limited width – approximately 350 yards. The Turks were waiting and when you consider how tight the boats would be to get in and slow moving it can be seen why the landing was so murderous. As stated in the dispatch the crews suffered heavy losses – all bar one of the Lord Nelson men were killed and the one survivor was wounded. And none of the boats got off the beach. Of those killed was Able Seaman Fred Hyde.
The second wave to come into V Beach was HMS Clyde, which was going to be deliberately rammed onto the beach and via modified openings in her side men would assault ashore via ramps onto pontoons created by the first wave. It didn’t go quite to plan and is a very famous action with a variety of VCs being won through the bravery of the men that day.
But their bravery is not the only ones recognised. there is a whole range of bravery awards given for the landings, of which all 10 of the Able Seamen from the HMS Lord Nelson were awarded a Mention in Dispactches (MiD), of which Fred Hyde of Hartshorne, South Derbyshire is one.
Fred died in the early hours of the 25th April 1915, manning the tiller of a small boat laden with men of the Dublin Fusiliers in the initial landing wave at V Beach of the Gallipoli offensive. His bravery was recognised on the day and a formal award granted. On this Anzac Day, the 25th April, take time to remember and commemorate the Australians and New Zealanders, but also the French, Indian, Irish, the Scots, the Welsh and the English men that fought onto the beaches of Gallipoli. And perhaps just spare a thought for a young 19 year old lad from a South Derbyshire Village called Able Seaman Fred Hyde MiD.

Penistone Arts Week – WW1 Talk on 24 Mar 26
Currently I’m working on a bit of research, having been invited to give a talk as part of the Penistone Arts Week.

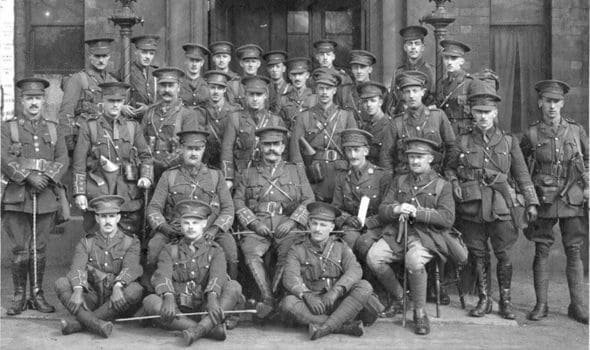
Officers of 1/5 Bn York and Lancaster Regiment, the local TA battalion for Penistone. https://penistoneartsweek.com/
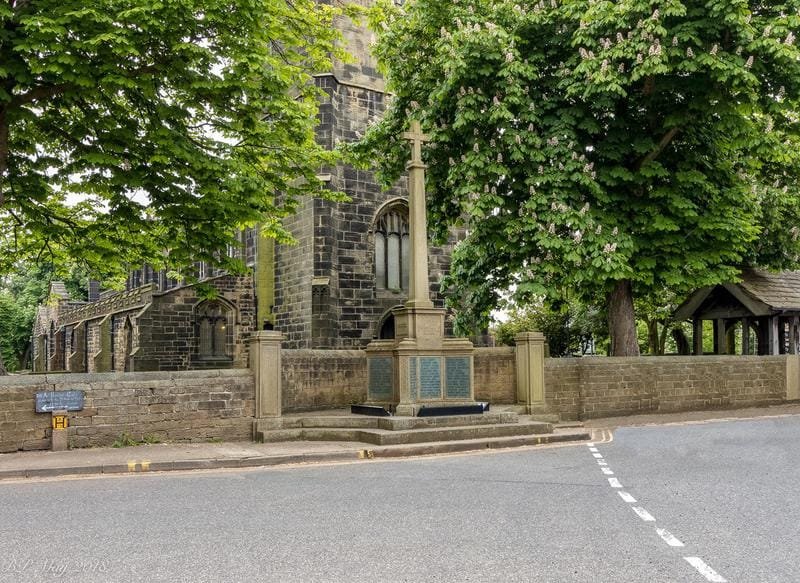
The town war memorial is located next to St John the Baptist Church and the plan is to look at some of the names on the memorial and talk about where they served, fought and died.

Like many memorials right across the the British Isles the memorial has a full cross section of those that fought in the Great War. There are Pre-war Regulars, Territorials, Kitchener Volunteers and also the Conscripted.
The named individuals also have covered across the full spectrum of the battle theatres – indicating that this small Yorkshire town had its men spread across the globe.
So works are ongoing, the talk will also have a living history element to it as well, but it is now starting to come together. Plenty to keep me busy with everything else that is going on at the moment!
Line of Communication Engineering Talk
Last weekend I had the privilege of delivering a talk at the Royal Engineers Reserves Study Weekend. This was focused on the Royal Engineer units involved in the Line of Communications.
The aim was to focus and discuss some of wide range of units used for the operation and maintenance of the Line of Communication – Basically the supply and logistics lines that supported the Front line units and the battle area.
The initial part looked at how the British Army learned the lessons of maintaining and securing the Lines of Communication during the Colonial period and then how the Royal Engineers deployed and refined its many skills in the Boer war with the LoC works and units

The period between the Boer War and the Great War saw some significant changes for the British army and for the Royal Engineers, with the creation of the British Expeditionary Force of 6 Infantry Divisions and one Cavalry Division. Linked with that there was the supporting RE units that were created to support the BEF and its Line of Communication.

at the start of the war the BEF had 2 Regular and 3 Special Reserve Railway companies. However the interesting part of the research was finding out that there had been very high level secret discussions between the British and French General staff in 1911 about the possibilities of a European war and how the BEF could be integrated and supported by the French. While the French made promises to support the BEF and to carry out all works and maintenance on the LoC for the BEF, in private they were quite dismissive of the fact that the BEF would only be 6 Divisions and as such didn’t merit any real support in comparison to the French Army.
Based on the assurances given, the British planning for a future European war didn’t focus on the LoC, this lack of planning and developing of organic British units would have significant impact when the war starts in 1914 and the race to catch up, combined with the rapid expansion of the British Army as a whole meant that it wouldn’t be until late in 1916 by the time that the British army had a handle on the LoC operation and the development of it going forward.

The BEF needed to provide specialist into French Ports to manage and unload the mass increase in British and Empire supply shipping It became apparent very early that the French Authorities at the British allocated ports could not deal with the increase in shipping and the management of stores, Troops and horses being unloaded and moved forward. The British had to bring in Managers and man power from British ports to take over the areas allocated and to unload shipping as quickly and efficiently as possible.
These ports also provided the locations for the RE Base Park Companies who would deal with works and stores and prepare to move items forward to the Advanced Park Companies who would then along side the Forward supply depots look at distributing the stores, material and equipment needed .

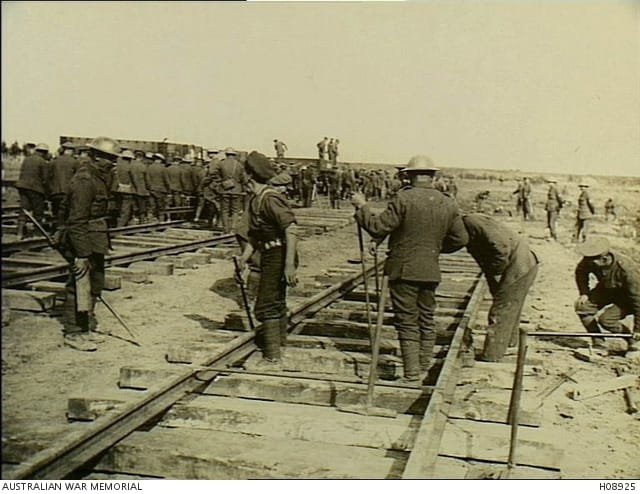
Engineer Stores being collected from an Advanced Park Company Area I also looked at the specialist LoC units that the Corps deployed and some of the impact that they had. Such as the expansion and development of the RE Railway units, both in terms of construction and operating the rail network at standard gauge and then from late 1916 the construction and operation of the narrow gauge railways.

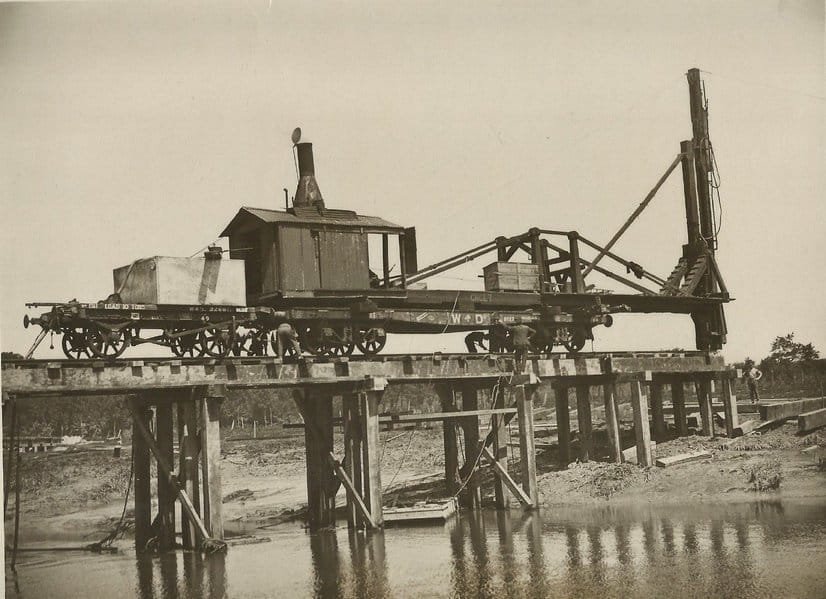
Steam pile driver constructing standard gauge railways over rivers in 1918. 
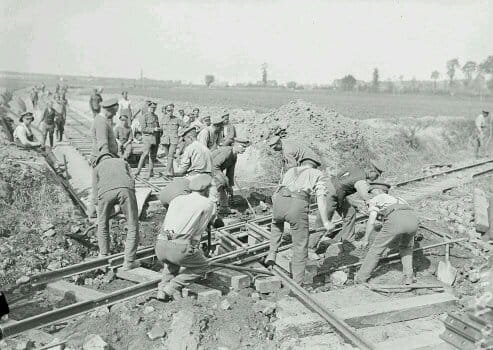
Light railway being constructed I also discussed the essential work of the RE Forestry Companies and the Canadian Forestry Corps and how they helped to reduce the need for importing timber, which in 1914 and 15 was taking 65% of tonnage space on ships, that space was needed for Men, munitions, food and supplies. As such the 11 RE Forestry Companies and the Canadians helped to reduce that significantly and by 1918 were supplying monthly and average of 51,000 tonnes of cut and worked timber for use by the BEF.
Another particular favourite unit of mine that was key to the BEF was that of the Inland Water Transport, responsible for operating of the Docks (as mentioned earlier), the navigable waterways and operation of vessels on the rivers and canals of France and Belgium.

IWT barges moving troops and stores forward from the Base Ports 
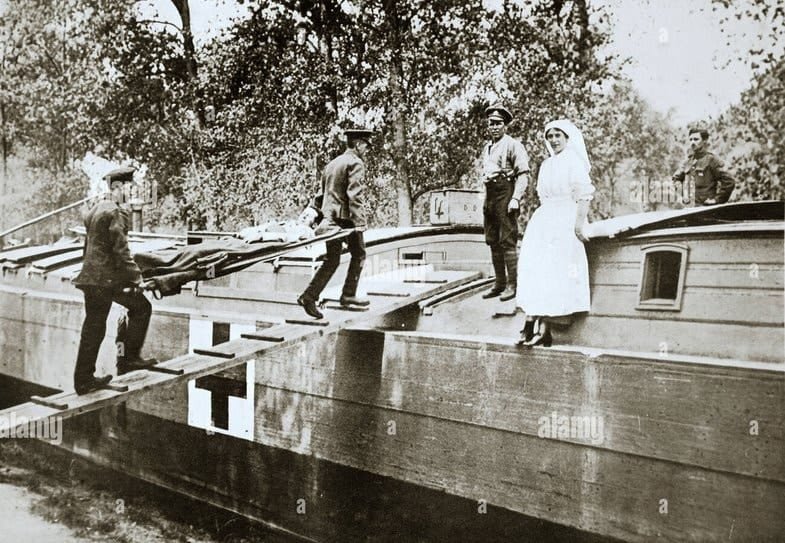
The IWT operated many Hospital Barges, these allowed medical staff to continue to work on the injured during a reasonable smooth journey to the rear as part of the casualty evacuation process. 
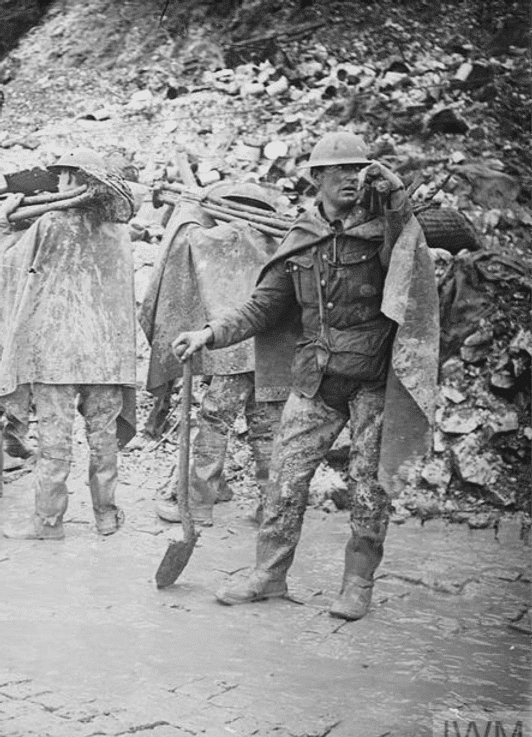
IWT barges collecting quarried material delivered by a Light Railway. It was also necessary to cover some of the other major LoC RE units, such as the labour battalions and the Road Construction Companies. These units were specifically recruited from the Navvies and the road units from the British Borough and County road departments, thus ensuring that those recruited where the masters of their trade and skills.

It was a similar story with the need for working Quarries to supply materials for construction and for the construction of roads.

And vitally important in the Flanders area was the need for specialist Drainage Companies, the Corps recruited experts from the Fen District to create 2 Drainage units.
The ramping up of the Corps through the war is interesting, while there is a lot of focus on the Special Units such as Gas Units and also the Tunnellers, the less glamorous units for the LoC are vital and their stories are just as facinating once you start digging into them.
The other piece that has been interesting when researching for this talk was looking at the Line of Communication development in two other theatres that I’ve been researching over the last couple of years. In the Egypt and Palestine campaigns of the Great War the development of solid Logistics and Line of Communications were key and often dictated the pace and planning of the Operations. In contrast the lack of planning in the Mesopotamia Campaign and not establishing solid Lines of Communication in that environment impacted directly on the Campaign and many battles and resulted in a 12 month delay while the LoC problems could be fixed before serious military offensive operations could be successfully undertaken.

Egyption Labour Corps and RE Troops build a water pipeline from Egypt into Palestine during 1916 to 1917. 
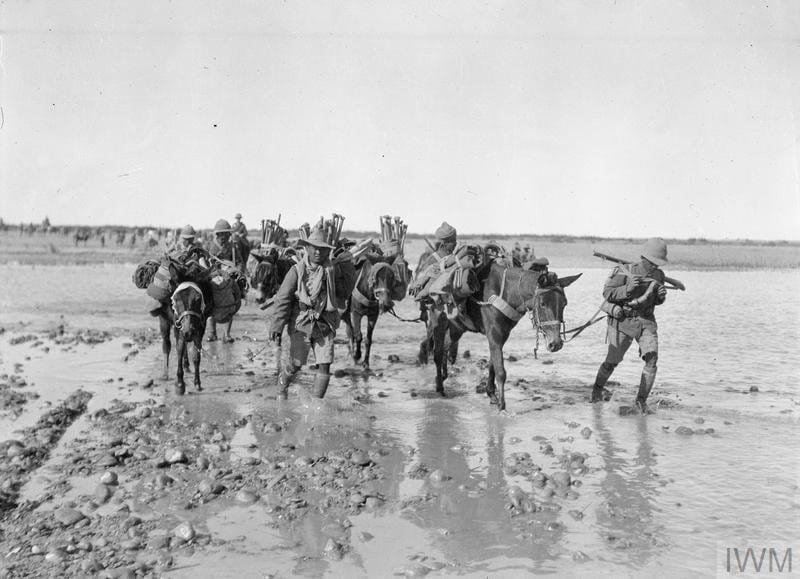
Troops wade through the flooded ground with their pack mules that was typical of the ground fought over regularly during the first half of the Mesopotamia campaign. Once again it has been fascinating to research the RE involvement in the LoC on the Western Front and a very specific area that I will look at in a bit more detail is the Secret talks between the British and French General Staff in 1911 to see how it impacted the early deployment of the BEF and the RE units that were deployed.
Royal Engineers Historical Society Study Day
Last week saw me in Ripon at Claro Barracks providing support for the Royal Engineer Historical Society (REHS) during their study day. The key theme was looking at Innovation in warfare and I was asked if I could put together a display of topics that was link to Great War RE Innovations.
With such a vast choice of areas to choose from, I made a point of looking at items that were linked or related to the Mounted Sapper units.
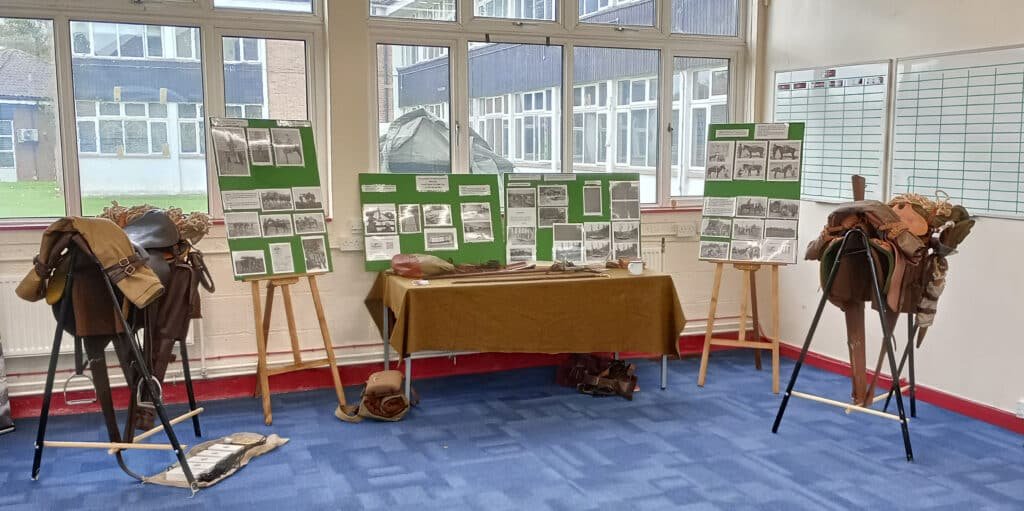
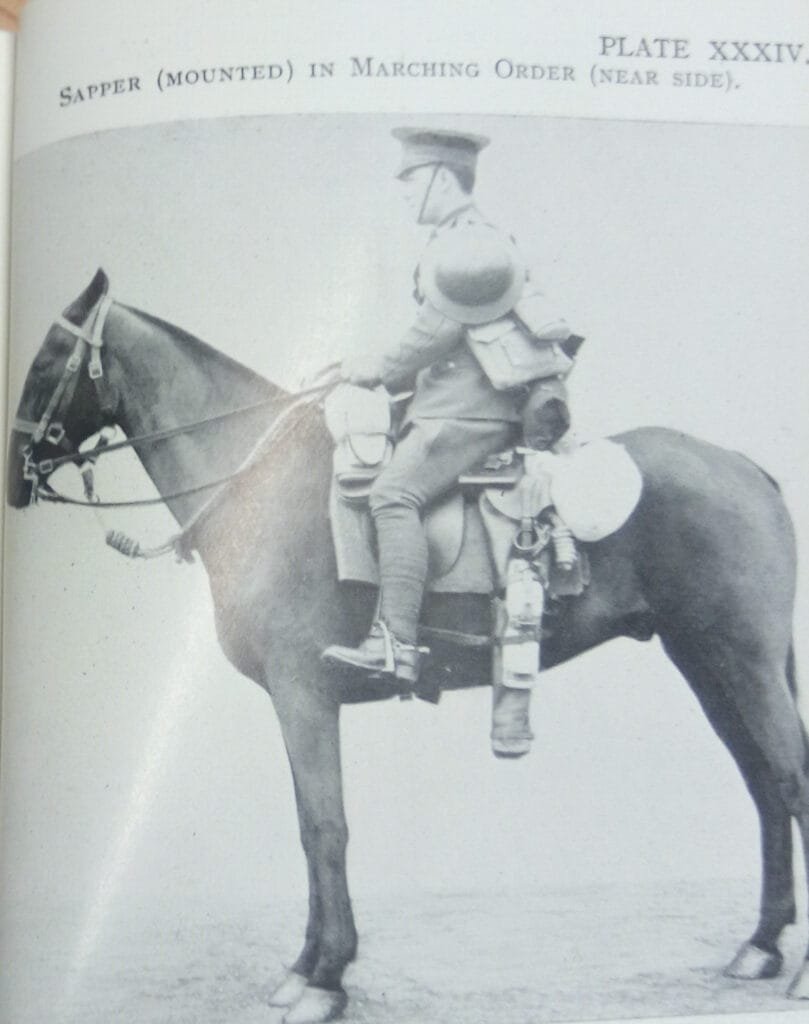
The event allowed me to put on display a UP Saddle set up for a RE Field Squadron mounted Sapper.

UP Saddle with RE Tool Bucket and demolitions kit The two key elements that make the UP Saddle Royal Engineers specific are the Royal Engineers tool bucket attached to the side of the saddle opposite the Rifle Bucket and then on the rear of the saddle is a sandbag filled with 10lbs of Gun Cotton, safety fuse, primers and detonators.
These two items allowed for the Mounted Sapper to be able to carry out Combat Engineering tasks independently and when on the move. There will be more details in a separate blog post on how the RE Tool Bucket would carry tools and equipment.
The event also allowed me to set out and trial my display boards for the first time. This is worked brilliantly. Covering a set of boards with a material to allow small velcro tabs to attach means that I can change the displays quickly and easily.

The other part of the event that was a first was that it allowed me to put together my early war RE uniform. This was made possible with a jacket tailored by Matt Palmer and a early war cap made by Dickie Knight at “Khaki on Campaign”. Added to that I’ve put together a double strap Sam Browne and the Sword frog.

The engagement with the attendees was great with lots of questions on saddles and the uniforms particularly the way that engineering tools could be carried on the saddle.
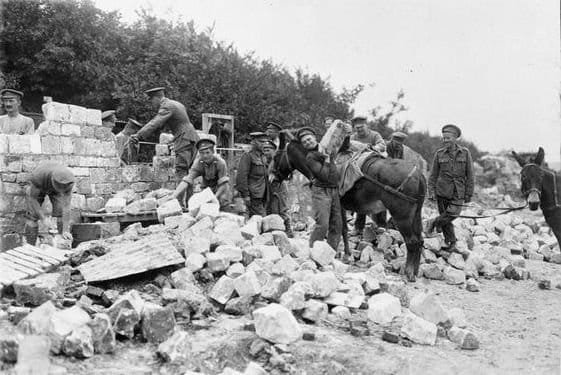
The other topic that picked up a lot of focus was the innovation on the carriage of water supply equipment on Pack Horse in Palestine. Chatting with a couple of serving personnel it appears that this is a topic that is current and back in focus again so for them to see this being looked at 110 years ago was fascinating for them.
So overall a successful event, proving that the display boards and early war kit works. Now it a case of getting back into the research and prep work to get ready for the next set of events in November.
The Horseback Sapper – Going forward
This website has been a bit of an evolution over the years. It all started as a Facebook Group to help with my preparations for the Warhorse 2014 ride and then evolved to a blog/ topic research page on its own website.

Its now starting to evolve a bit more.
Having now retired from the Army I want to spend a bit more time (if the Memsahib allows and if I get all of my farm tasks completed….) doing historical research, assisting with Battlefield Studies and also taking part in more Living History events.

The research will continue to be focused on the Mounted RE Units, but I would like to dig further into the Derbyshire Yeomanry particularly as there were two troops local to where I live – Repton and Church Gresley. The infantry aspect is still of interest due to family connections with the Seaforths (my side of the family) and also with the Norths Staffords (the memsahib’s Grandfather).

Kitted out as a 5th Seaforth with the Horse Transport Platoon during a visit to Fort George The Living History side will hopefully see me providing assistance to groups such as 508 Company ASC (Horse Transport) living history group as well as linking in with other individuals.
The website is continuing to be checked as there are still blog posts that have lost their original images, this seems to have been due to a legacy issue when the blog was initially hosted on wix and then transfered over to a wordpress format. However I am now working through the old posts and updating the image archive.
There are a number of draft posts that need to be worked through and completed such as:
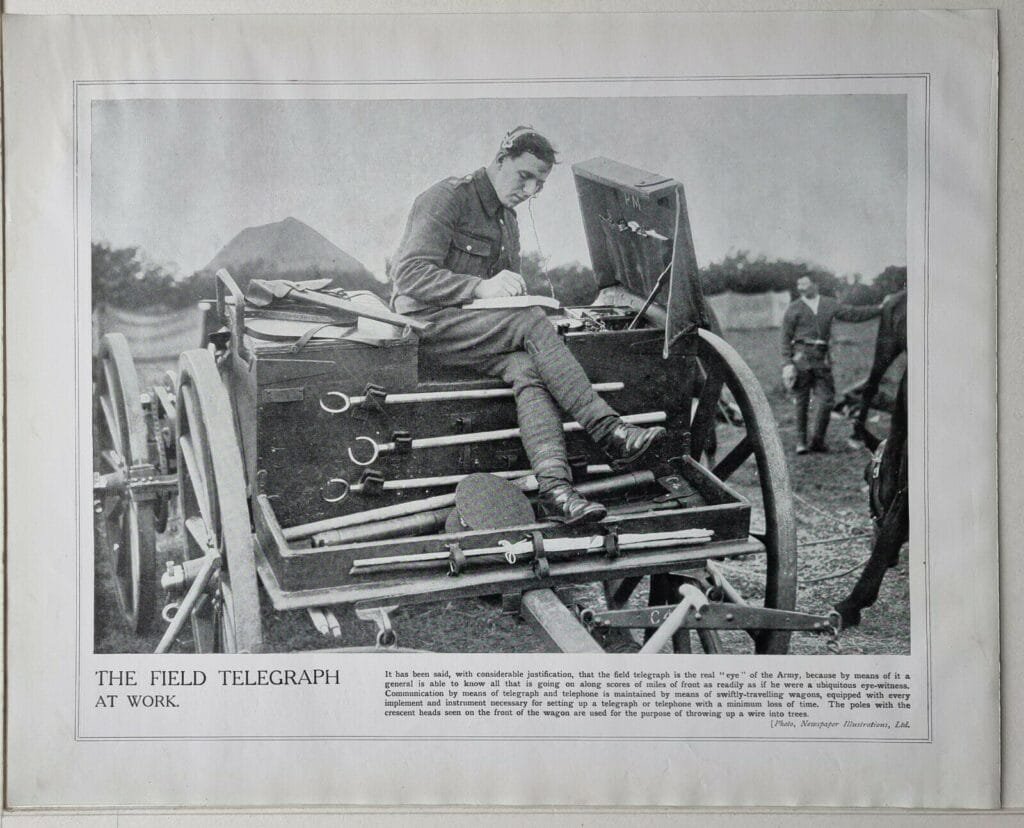
- RE Cable Wagon
- Correcting the Corps History – Part/ Rant 4
- Officer’s equipment
- Officer’s valise
- and several others……

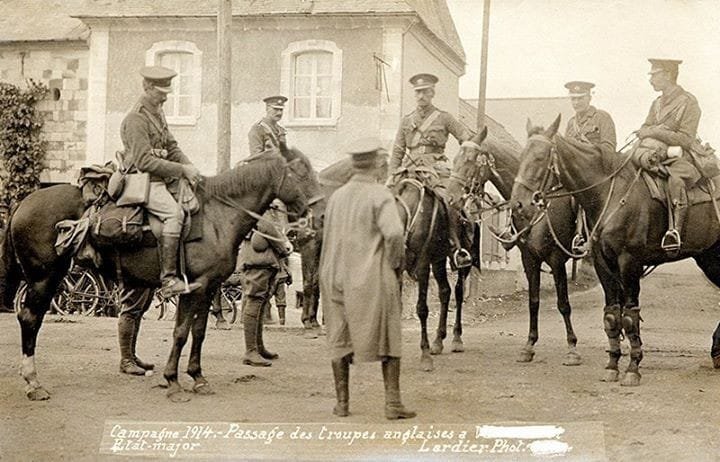
Fully equipped Officers in France 1914 with field equipment and loaded saddles. The other aspect is that the website will give more information about events that I will be attending and also what I can offer if someone wants help at an event, talks, show and tells or assistance with Battlefield studies/tours or projects.
So there is a lot on the cards for the Horseback Sapper and it will be interesting going forward.

Blog Post photos – Bit of work needed!
Over the last few weeks I’ve noticed that some of the photos for the blog posts have gone missing from the posts.

So at the moment I’m working my way through some of the posts to get the images back and also set a “feature” image for each of the posts.
I don’t think there was anything sinister with the loss of the images, I think it was possibly down to the updating of the website and changing the theme/ layout. So to that end I’ve got something to keep me occupied as I check through the blog posts.
Oh well, best bash on……
Researching the Sappers in Mesopotamia

Over the last few months I have been researching the Mesopotamia campaign, 1914 through to 1918 and beyond. There is couple of things that make this an interesting focus for me. The first reason is that having served in Iraq as part of the 2003 invasion and having covered a lot of the same ground that the British covered in the Great War.
The second is while I was researching the names on a Great War memorial in Wick, in my home county, there was a Royal Engineer Officer that died in Basra in 1920. He was serving with the Inland Water Transport and died during the Arab Rebellion of 1920. All of this was interesting due to location and the fact that for some soldiers the Great War didn’t finish in 1918.

The campaign in 1914 started with some very specific aims to protect the oil supply from Persia, and the taking of Basra was key to provide the stand off for that protection. But it became very clear reading the history that the amount of politics in the background, and the unwillingness to commit resources (troops, equipment and funding) all added to a future disaster. All of this sounds so familiar to the experiences of 90 years later.

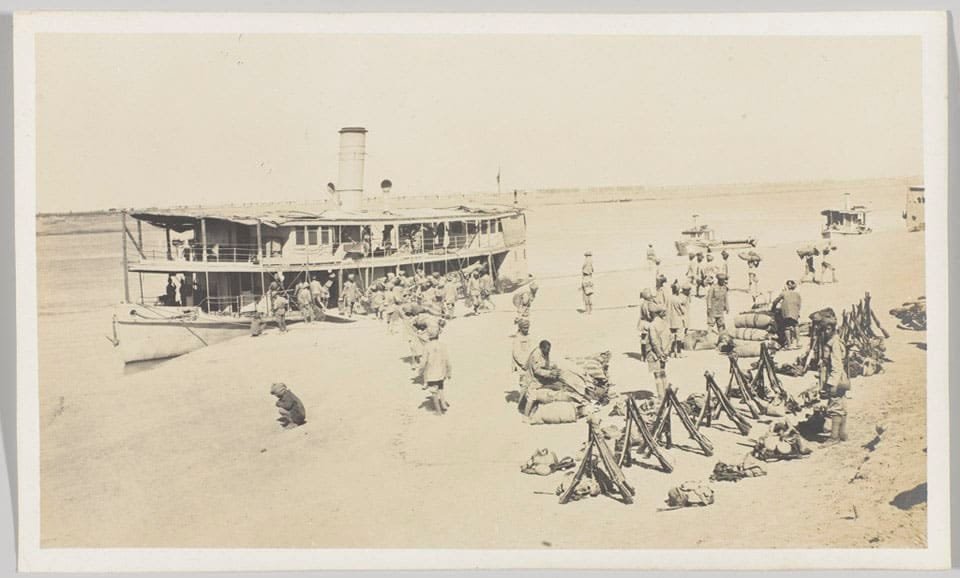
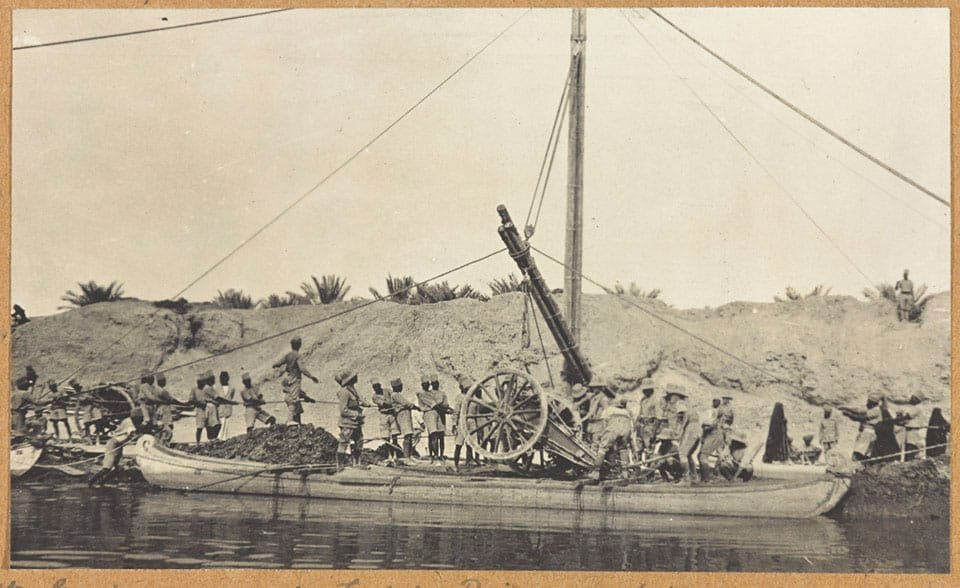
Unloading of Artillery at Basra, due to lack of port facilities local boats had to be used in the unloading process. Photo shows a Royal Engineers Field Machine, a standing derrick in use. The other aspect that became very clear of the early campaigns of 1914 and 15 was the lack of allocation of specialist troops to the operation, particularly Sappers and Gunners.
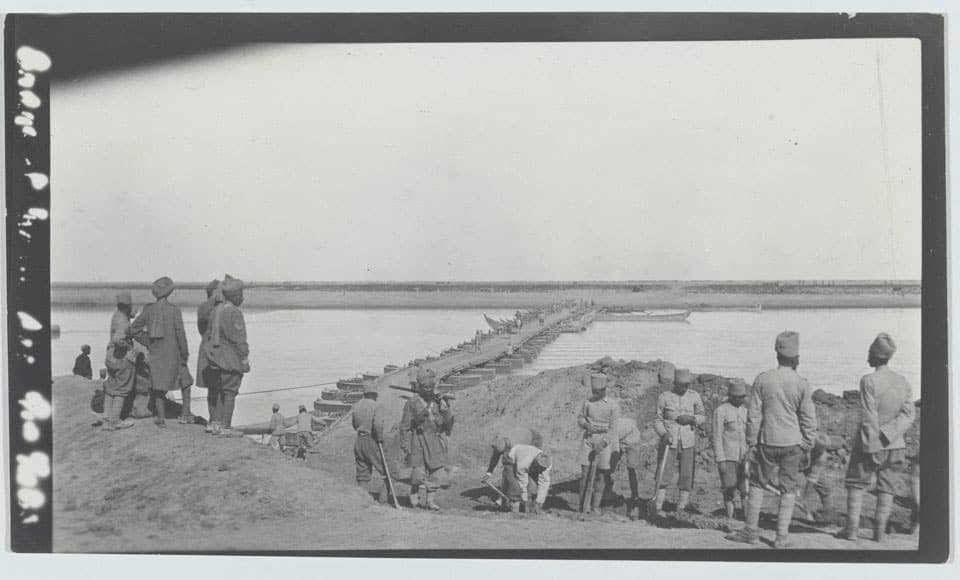
This particularly meant that there was not enough bridging equipment (tressles and pontoon equipment). The availablity of timber was so lacking locally that palm trees were considered until it was realised that they would not be able to give the appropriate level of strength required.

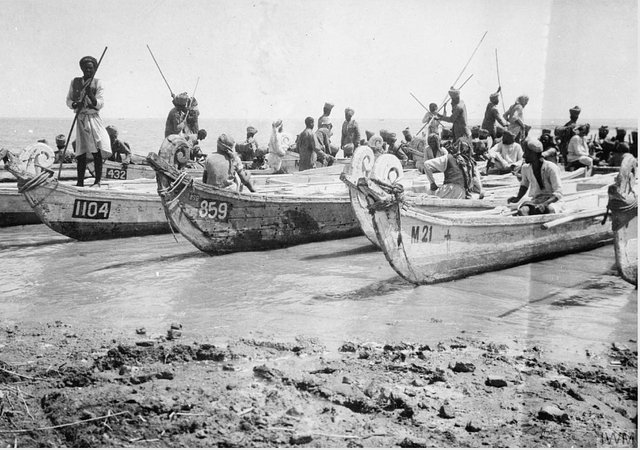
However, as is often the case the RE Officers and the men of the Sappers and Miners Units that were in Theatre took on the traditional mantra of “Improvise, adapt and overcome.” The metal pontoons were used singularly rather than double (while this reduced the loading it was deemed acceptable). Also some of the local fishing boats were taken into service and modified so that they could be used as pontoons in bridges.

These local craft were far from ideal but they worked and became a vital part of the Bridging equipment. They were also an important part of the ability to load and unload the larger ships/ boats that came to Basra or operated further up river on the Tigris or Euphrates.

One of the other problems was water supply. The operation was meant to be a limited action and as such there was a shortage of watersupply equipment for the Sapper Units and also of water carts for all units. With the daytime temperatures being high and the fact that the soldiers had a significant amount of marching and fighting, the 2 pints of water that they carried in their water bottles was wholly inadequate.

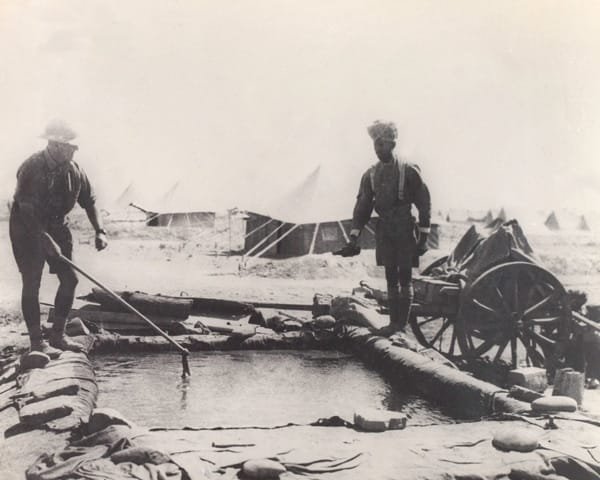
Sedimentation pond, part of the water supply process The interference and misreporting on the situation to meet political requirements meant that key equipment such as water supply, medical equipment and medical provision was not provided. It was only the disaster of the surrender of the 6th (Poona) Division at the Siege of Kut in April 1916 brought the Theatre into full focus and a change in the approach to fighting the campaign.

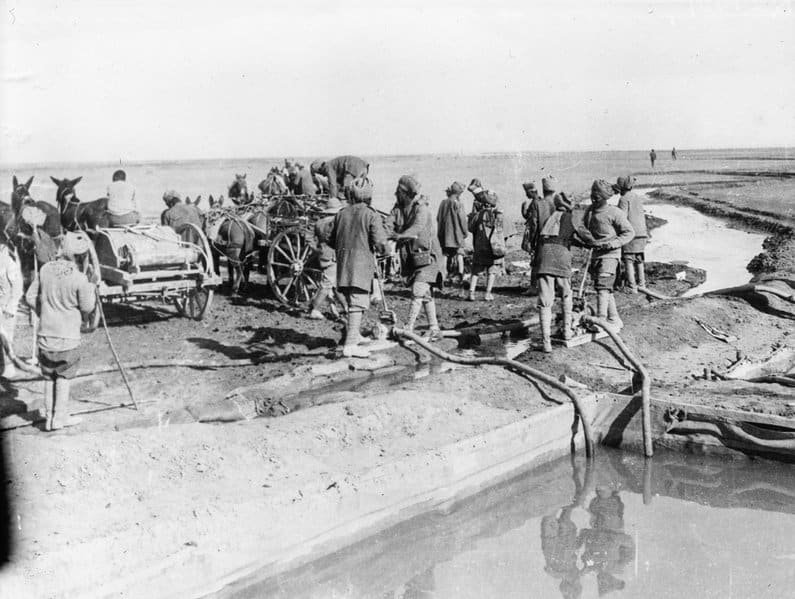
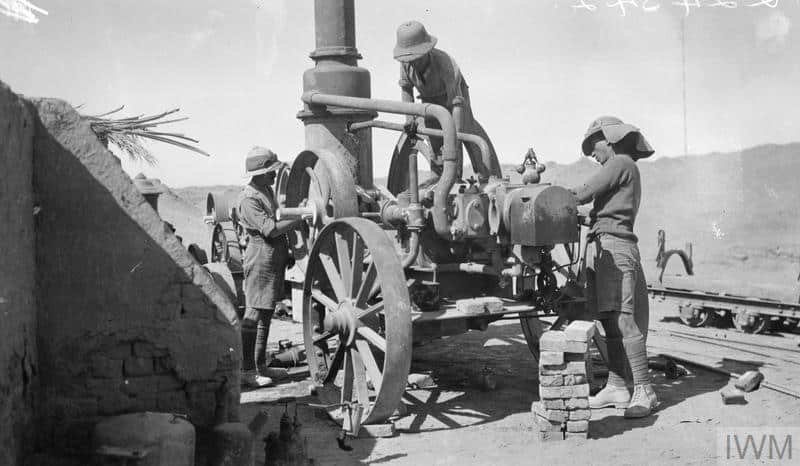
A prepared water distribution point with water being pumped into unit water carts. 
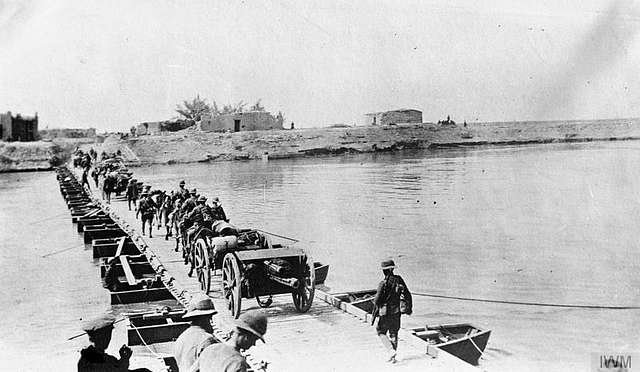
Mechanical pump sets were only seen in the main locations such as Basra and Amara in the early stages of the operation, with them only progressing further into Mesopotamia later in the war (1917 onwards) Another key element that was completely inadequate in the early part of the war was the river transport, in a country where the rivers provide the best and fastest method of movement. There was a significant lack of river capable vessels, therefore it became necessary to utilise every vessels and boat that had a shallow draft.

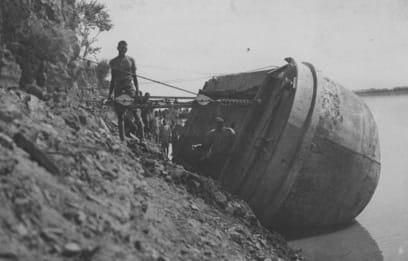
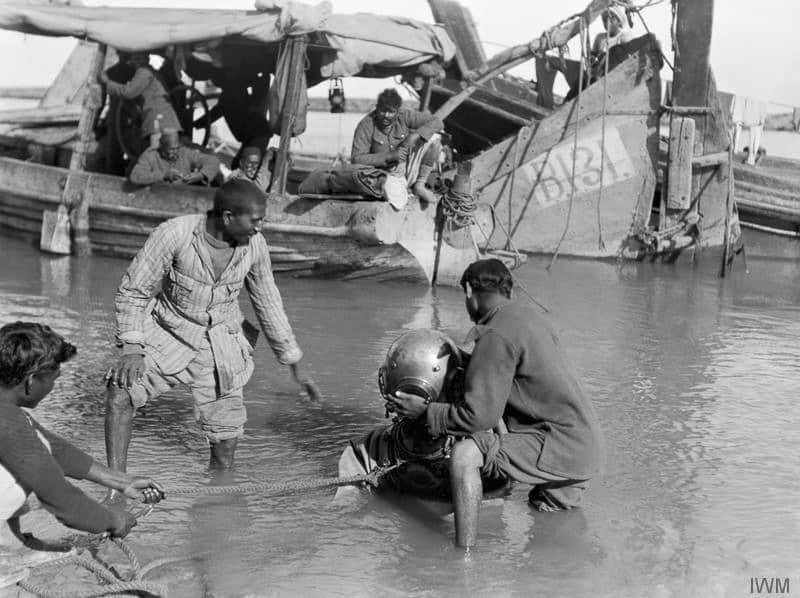
Indian Sapper & Miners work to salvage and refloat an abandoned Turkish Army vessel With both the Tigris and the Euphrates rivers having such fluctuations in depth it was not uncommon for the vessels to runaground or to get stuck on sandbanks. As such the RE and Sapper and Miners units would often be tasked to free the vessels or assist with salvage and repairs.

Indian Sapper & Miner diver helped back to shore having been down to clear an obstruction. Later in the war it was recognised that the management of the ports and river operations needed to be significantly improved as as such the Sappers became more formally involved by the bringing into to Theatre the Inland Water Transport units and commands. This key addition of the IWT to the ports, particularly Basra, and to the operation of the rivers drastically improved the logistics across the whole of Mesopatamia.
Overall it is proving an fascinating area of research and in particular the amount of bridging carried out by all of the Sapper units and the way that they dealt with improvisation to deal with equipment shortages and also to ensure free movement on the rivers while allowing the movement of troops.
There will be more detailed and focused posts to come.
References:
Lt Colonel EWC Sandes RE, The Military Engineer in India, 1927 Naval and Military press
NS Nash, The Betrayal of an Army, Mesopotamia 1914-16, 2016 Pen and Sword Books
C Townsend, When God Made Hell, The British invasion of Mesopotamia and the creation of Iraq. 2010
Faber and Faber
Major EWC Sandes RE, In Kut and Captivity, 1919, Murry publications
1st July, The Somme Offensive – a personal take
This is a very short post but it would be remiss not to take the time and the moment to just remember that today is the 109th anniversary of the start of the battle of the Somme – 1 July 1916.

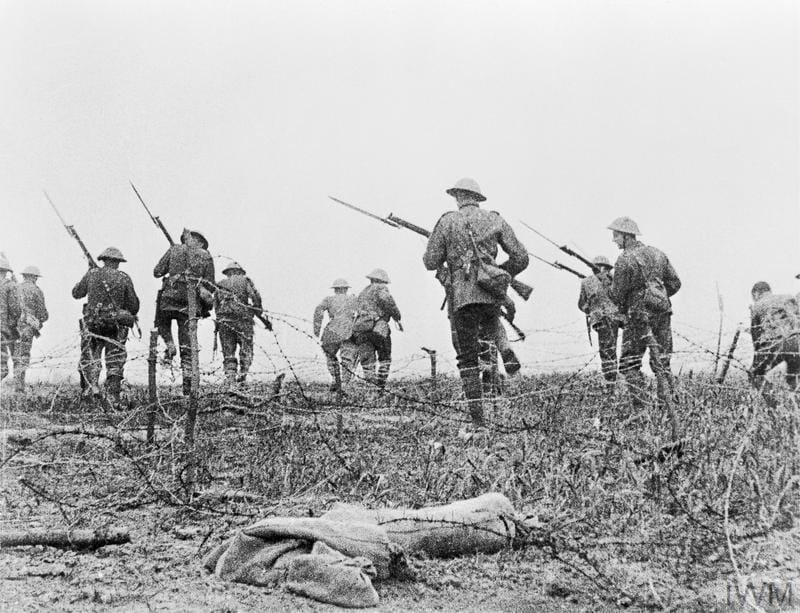
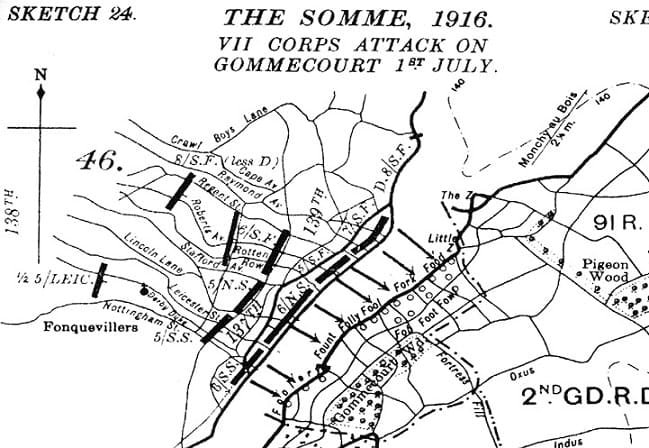
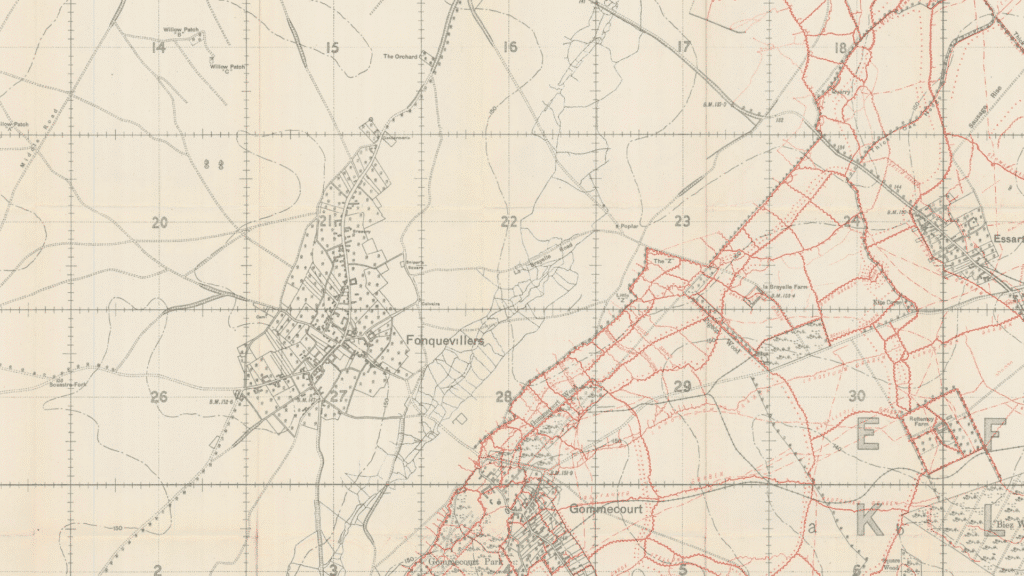
As part of the offensive there was one area that was earmarked to act as a diversionary attack to try and prevent the germans from sending reinforcements to the main attacks, that area was at Gommecourt on the northern area of the British Somme area.

The attack onto the Northern side of Gommecourt Wood was carried out by the 46 North Midlands Division of which the 5 and 6th Bn of the North Staffordshire Regiment were part. These were pre war territorial battalions but were also hard early war volunteers.
One of those Volunteers was my wife’s Grandfather, while he was a Derbyshire man he enlisted in Burton on Trent and found himself initially in the 5th Bn North Staffs but later with the 6th Bn. This would be his, as it would for many others of the regiment, first battle and the first time “going over the top”.

The battle did not go well for the Division that day for a whole variety of reasons, something that I’ll look at doing as an in depth and detailed blog post later.
Having walked over the battlefield and the specific ground that was the trenches of the 5th and 6th Bn North Staffs it is incredible to look south at the couple of hundred yards that had to be covered to reach the German trenches on the edge and inside Gommecourt Wood. Not a big distance but when you are weight down with kit and stores, rifle and ammunition that couple of hundred yards with some “German Bastard” shooting at you, that is a long way by anyone’s money, and it was probably even longer to get back to your own trenches at the end of it as well.
So, just a few things to take a moment and think on:
- The 1st July 1916 is the first day of the battle of the Somme.
- The numbers of casualties are very high on the first day but these are the numbers for dead, injured, missing and prisoners. It is a big butchers bill but look beyond the headline number.
- This battle of the Somme continues onto November 1916.
- While Gommecourt is a failure, there are significant successes on the first day, particularly in the southern areas.
My wife’s grandfather survived Gommecourt and the war, despite being gassed in the March/ April German Offensives of 1918, but all I would ask is that if you read this post, just take a bit of time today and think of those that were on the Somme in 1916.
Recreating the 1890 UP Saddle
Nearly 2 years ago I was contacted by Gerard Hogan, an Australian Saddler and conservator with the Australian Army Museum about my 1890 UP Saddle. Gerard wanted to get some more details about the Saddle and if possible if I could make paper templates of each of the elements of the saddle as there were a whole host of components and parts of the saddle that sparked interest for him.
One of the things that he was particularly interested in was that he wanted to see the feasibility of recreating it as the Australian Army Museum did not have a 1890 UP in its collection.
Having taken a large number of photos and made templates and paper traces for Gerard and now 18 months on I’ve been very fortunate to see the result of the work done by Gerard and others in Australia. The following information and photos have been provided by Gerard.

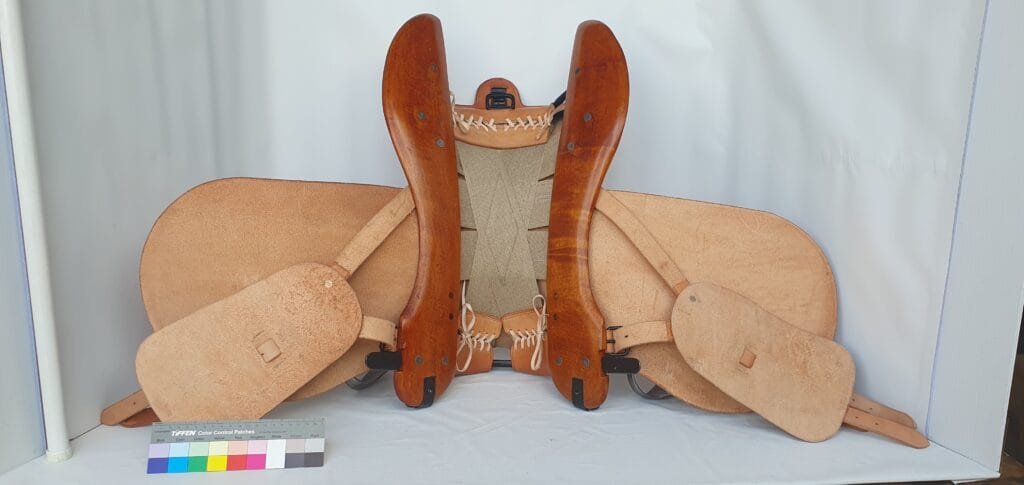
This saddle (Universal Saddle, Steel Arch, Pattern 1890.) depicts the Mk I without the split seat, and is fitted with the first pattern V-girth attachments (the MKI), and the MKIV numnah felt, as no numnah panels were fitted to the Mk I saddle.
The lancer pattern stirrup irons are fitted to this saddle, and these are original NSW Lancers stirrup irons made in 1885 England. The Mk I also had brass runners fitted to the stirrup leathers but we have to make these as it is impossible to locate brass runners.
However we forgot to add the leather caps to the side bars for this pattern of saddle. This meant this pattern, the Mk I, did not have felt numnah pannels fitted until the Mk II. The purpose of the caps protected the sidebars from damage and were held in position over the fans, by screws.
This was the period of time that the British War Office was experimenting with dispensing with the bulky horse hair pannels and using felt as an option.
Interestingly, the Mk I also had a small tab fitted into the slot on the rear edge of the seat on both sides. This tab looped under the foot of the rear arch as there was a small bevelled channel made into the timber side bar. The idea was to hold the seat down but it was soon found to be unnecessary. By the time of the Mk II introduced into service, this was dispensed with.
In service, the MkI had a brown saddle blanket fitted under the saddle and on top of the felt numnah Mk IV.
The Mk IV numnah felt had a front and rear small strap fitted and this was buckled to the front buckle on the saddle seat, and the rear buckle under the rear spoon of the rear arch, this was to hold the felt and blanket in place whilst in service.
It was found the saddle was too slippery in this manner on the horse and although the numnah felt could be ‘brought up’ into the front arch off the shoulders, the blanket often bunched up or fell out whist in service.
Therefore the MkII was fitted with the first pattern of felt numnah panels. This had a pouch to fit the front arch point and the rear fan had no brass loop fitted. This now provided the necessary grip on the brown blanket. Soon after this the numnah felt was then fully dispensed with.
Saddle Work Credits:
Arches were blacksmithed by WO2 Bruce Sinclair Ferguson RQMS (Australian Army History Unit, Australian Army) and are Mk I arches for the Universal Saddle, Steel Arch, Pattern 1890.
Leatherwork by Gerard Hogan the Regimental SaddlerTM
Timber side bars were made by Australian saddle tree maker Jeff Freeman.
Saddletree and leather assembly by WO2 Ferguson.
I have to say that I’m incredibly impressed with the work and effort that has been done to create the Saddle and I’m very pleased to have been able to help in this project for Gerard and the Australian Army Museum.